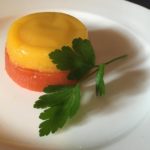
VEGAN CHERRY JELLIES

Vegan cherry jellies

Fancy a dessert that contains all the flavor of ripe cherries? If the answer is yes, then you absolutely have to try my vegan cherry jelly recipe. Forget about industrial jellies; here we only use fresh fruit pulp and agar-agar, a vegetable gelling agent, also suitable for those who have a particular diet (gluten intolerant), healthy, natural and incredibly tasty. Follow these simple steps to bring a summer concentrate to the table. A perfect vegan cherries jelly, inclusive delicacy, a recipe that can be transformed just changing the fruit with other seasonal one. The use of agar-agar forces me to use the decimal system, that is far more precise than the Imperial one.

Prep Time: 10 minutes | Sitting Time: 2 hours | Yields: it serves 4.

Ingredients:for vegan cherry jelly 

  • 6 G agar-agar powder
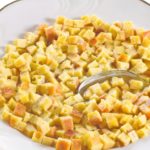
  • 320 G cherry pulp, about 400 G cherries washed and deprived of stones and stems, diced
  • 350 G water
  • 32 G white sugar

Method:How to make vegan cherry jelly

  1. Combine all the ingredients in a saucepan and boil for 4 mins. Blend with an immersion blender.
  2. Meanwhile, lightly grease 4 small tins with vegetable oil. Pour cooled jelly into tins through a sieve. Refrigerate for 2 hours to set completely.
  3. Remove from fridge and use the point of a sharp small knife to carefully release the dessert from the tin along the edges. Lightly grease your serving platter with oil. Place the platter upside down on top of the tins, then swiftly flip them over so that the tins is now upside down, and (hopefully) allow the dessert to fall out onto the platter.
  4. Serve immediately, or refrigerate until ready to eat.

NOTES

+ 2 hrs refrigeration.

http://Agar-agar WikipediaBrief history of agar-agar

DARK CHOCOLATE CAPRESE CAKE


SAVORY TARTE TATIN WITH TROPEA SPRING ONIONS

After centuries we are still thanking the Tatin sisters for the famous apple tarte we all know well and love. From this mistake that produced caramelised apples baked with no shortcrust pastry, added later on the top of the fruit when they realised their forgetfulness, incredible variations with vegetables emerged.

This modification of my previous recipe made with cherry tomatoes in another post valorises Tropea onion, a red onion extremely sweet and valuable, typical of the Calabrian village called Tropea (an incredible ancient spot which overlooks the Mediterranean sea).


Prep Time: 30 minutes | Cooking Time: 45 mins | Yields: it serves 8.

Ingredients

For the savory shortcrust pastry (of course, you can buy a shortcrust)

  • 250 g (2 cups) gluten-free flour
  • 40 g (1,4 oz) Parmigiano Reggiano, grated
  • 140 g (5 oz) unsalted butter, very cold
  • 2 medium eggs
  • 6 thyme sprigs
  • salt and pepper to taste

For the filling

  • 900 g (2 lb) red (Tropea) spring onions, cleaned and cut into 2 halves
  • 20 g (0,7 oz) white sugar
  • 1 clove garlic
  • 4- 5 thyme sprigs
  • salt and pepper to taste

Instructions

The savory shortcrust pastry

In a food processor, add flour and cold butter into small piecesand blend for a few moments until the butter is reduced to very fine crumbs.

Add the grated cheese, egg, thyme, salt and pepper and blend again until all the ingredients are mixed together.

Turn the mixture over on the work surface and knead quickly until the mixture is smooth and homogeneous. Form a ball with the dough and, using a rolling pin, roll it out between two sheets of parchment paper. Once you have created a circle of about 30 cm, place it on a baking sheet and store in the refrigerator to firm.

The filling

Take a cake tin or pan suitable for baking in the oven and cooking on the stovetop with a diameter of 26 cm and add a little extra virgin olive oil to the bottom, a clove of garlic, and thyme leaves. On medium heat on the stove top, sauté and brown the garlic then remove it. Arrange the onions, middles uppermost, around the edge of the pan and then fill in the center with the remaining onions. It is important to pack them as atightly as possible – press them down with your hands as you go. Add sugar, salt and pepper then cook for 20 minutes and then turn off the heat.

Assemble and bake

Take the salted pastry, pierce the surface with the tines of a fork (or with a toothpick) and place it on the onions treading the outer edges towards the inside of the pan as if to embrace them. You can help yourself in this operation with a spatula.

Bake the tarte tatin in a preheated static oven at 175 degrees Celsius for about 35 minutes.

Remove from the oven, wait 10 minutes so that the juice of the tomatoes is absorbed by the pastry and turn it upside down on a serving plate. Add some toasted pine nuts on the surface, a few fresh thyme leaves and serve your slice of tasty salted tarte tatin with Tropea onions!


DARK CHOCOLATE CAPRESE CAKE

Dark chocolate Caprese cake

This gluten-free dark chocolate cake was created by accident in Capri in 1920, in a similar way to the birth of Tarte Tatin. The pastry chef was in a stressful day and created this magic cake with chocolate and ground almonds forgetting flour: the result is this magic cake covered by a thin and crunchy crust that contains a moist and soft interior like a chocolate truffle.


Prep Time: 10 minutes | Cooking Time: 30 minutes | Total Time: 40 minutes | Yield: Makes 8 servings.


Ingredients for a 7 IN (20 cm) mold

  • 6,5 oz (g 185) almond flour
  • 4,5 oz (125 g) dark chocolate 70%, crumbled
  • 4,5 oz (125 g) butter, soft
  • 3 medium eggs, room temperature (kept out of the fridge at least 12 hours in advance)
  • 4,5 oz (125 g) white sugar
  • 1 tablespoon dark rhum

Instructions

Melt chocolate and butter in microwave or bain-marie until they are perfectly mixed and smooth.

In another bowl, using a hand mixer, mix for some minutes 3 yolks and 2,8 oz (80 g) sugar, until they are soft and foamy. Add the Rhum, still mixing and the chocolate and butter.

Place half of the sugar into a bowl and the egg yolks. Using a hand mixer on medium-high speed, whisk the ingredients. After a few minutes the mixture will be frothy. Add the Rhum, keep mixing, and the mix of chocolate and butter.

In another bowl pour the egg whites and the remaining sugar. Make sure that the whisks are clean, otherwise the egg whites will not whip.

After a few minutes the egg whites will be shiny and frothy: you have to whip them stiff. When all preparations are complete, preheat the oven to 340°F (170°C) in convection mode and start combining them: fold a third of the whipped egg whites then a third of the almond flour into the egg yolks and chocolate mixture using a spatula, stirring gently from bottom to top. Add another batch (one third of the egg whites and one third of the dry ingredients) and continue until you get a uniform texture.

Pour the smooth and creamy mixture into a buttered 7-inch (20 cm) round cake mould already buttered and floured with potato starch. Carefully level the surface and bake in a convection oven at 340°F (170°C) for about 45 minutes.

Once baked, let the cake cool down in the mould, then turn it upside down to unmould it. Then turn it over again on a plate lined with baking paper and let it cool completely. Once cold, turn the cake upside down one last time, remove the baking paper and dust the surface with powdered sugar.


AN EASTER EGG WITH CHOCOLATE BAVAROIS

Easter chocolate egg

The tradition of Easter eggs is a very ancient one, as it stems from the celebration of spring as a rebirth. It is the only celebration in the Christian calendar which has a variable date, falling on the Sunday after the first spring full moon.

The festivity’s name itself – Easter in English and Ostern in German, comes from Eostre, the ancient Northern goddess who is at the origin of many traditions related to this festivity.

The egg, never mentioned in the bible, is present in many Indo-European cultures as a symbol of fertility, and eating it is a way to celebrate Spring, the renewed cycle of the seasons and the new agricultural crops.

In the Middle Ages, eggs were cooked and decorated with flowers and leaves. Being in lockdown because of the coronavirus, I had no time to indulge in buying decorations at the grocery store, so I used pansies from my garden.

If you have other supplies in the fridge (I had bought an incredible quantity of raspberry puree before the lockdown, and I always store supplies of gelatine and baking products in my pantry), it could be fun to make some namelaka – a Japanese word that means ultra-creamy.

Prep Time: 40 minutes | Cooking Time: 35 minutes | Total Time: 1 hour + 15 minutes | Yield: Makes 8  servings.

Ingredients for chocolate bavarois


  • 200 g dark chocolate, chopped finely
  • 200 g fresh whipping cream
  • ½ L (2 cups) milk
  • 200 g white sugar
  • 4 yolks
  • 20 g gelatine

Ingredients for namelaka

  • 112 g raspberry purée
  • 7 g icing sugar
  • 170 g white chocolate, chopped finely
  • 2.5 g gelatine
  • 200 g whipping cream

Instructions for chocolate bavarois

Put the chocolate, the milk, and half of the sugar in a saucepan and melt the chocolate, stirring constantly.

Soak the gelatine leaves in water to soften.

Prepare a bain-marie. Whisk the yolks and the remaining sugar in the bowl until the mixture is light and fluffy. Squeeze the gelatine, add it to the mix, and melt. Add the chocolate and str until it becomes thick.

Let it cool, and when it reaches room temperature, whip the cream and add it to the mixture. Incorporate slowly, folding it in with delicate movements from top to bottom.

Pour into the mould and refrigerate 4 to 5 hours before serving.

To remove it from the mould, dip it into a bowl of hot water for 2 or 3 seconds, then turn the bavarois over onto a dessert plate and remove the mould.

Instructions for namelaka

Melt the chocolate in the microwave or in a bain-marie.

Soak the gelatine leaves in water to soften.

In a saucepan over low heat, combine the fruit purée with the sugar, squeeze the gelatine, add it to the purée and melt.

Combine the fruit mixture with the white chocolate and emulsify it with an immersion blender.

Add the cream and emulsify with the immersion blender again.

Place in the fridge and let it sit all night.

The day after you can whip with a mixer and use it with a pastry bag.


ASPARAGUS RISOTTO, A SPRING TREAT

This risotto recipe is typical of Tuscany and Northern Italy, where asparagus is a symbol of Spring. I use a local asparagus variety that is smaller but tastier than bigger varieties. Risotto is a much appreciated first course on Italian tables, and while this recipe can be used with other vegetables, the main steps are the same.

The origin of this dish is quite ancient. News of the cultivation of rice in Italy date back to the 15th century. Rice has come a long way, since it was domesticated from the wild Oryza rufipogon  grass  roughly 10,000–14,000 years ago the middle Yangtze and upper Huai rivers, as archaeological evidence points out.

In Italy, rice was an exotic grain introduced by the Arabs in Sicily, and later by the Aragon Dynasty during their domination of the kingdom of Naples. From there, it slowly spread north, to Tuscany and later to Lombardy, under the rule of Lodovico Sforza. Since the great Leonardo da Vinci was working at his court at the time, some Lombards like to think that Leonardo himself suggested transforming the Lombard marshes into rice paddies, but there is no historical evidence of it. What we know for sure, from diplomatic correspondence, is that rice was cultivated in Milan, and in 1375 Lodovico sent some sacks of rice to the Dukedom of Ferrara as a gift, in order to introduce its cultivation in Ferrara too.

The typical Italian rice is derived from the Japonica variety, more adaptable in the temperate regions of Europe.

In some way, this risotto with vegetables is a variation of more prestigious recipes, like the typical Milanese risotto with saffron, of which we have a recipe by Leonardo. As rice was still an exotic and expensive grain, it was eaten at the courts, and enhanced with other precious ingredients such as saffron, cinnamon, or the addition of savoury meat stock. It later developed into fantastic dishes such as Parmigiano risotto or the Champagne risotto.

Prep Time: 10 minutes | Cooking Time: 30 minutes | Total Time: 40 minutes | Yield: Makes 4 servings.

Ingredients

  • 1 lb (400 g) asparagus, washed
  • 12 oz (300 g) Carnaroli or Arborio rice
  • 4 tbsp (60 g) butter
  • ½ white or yellow onion, minced
  • 2 cups (500 ml) vegetable stock, warm
  • 3 tbsp grated Parmigiano
  • 2 tbsp olive oil
  • Sea salt

Instructions

Steam the asparagus for 10 minutes – they must be crisp.

Cut the tips and set aside. Chop the rest of the asparagus and set aside.

In a saucepan, melt 2 tablespoons of the butter and sauté the asparagus tips for 1 minute. Meanwhile keep the vegetable stock warm.

In another saucepan, melt 1 tablespoon of butter and 2 tablespoons of olive oil and  sauté the onion, stirring often, until golden and very soft, about 8–10 minutes. Add the rice. Stir until the grains become translucent, about 3 minutes. Add the asparagus (not the tips) and ladle in ½ cup of the  broth and simmer, stirring frequently, until completely absorbed, 5–6 minutes.

Cook the rice according to the package instructions, stirring and adding the warm vegetable stock in small ladles as needed.

When rice is cooked al dente, turn off the stove and add the rest of the butter, stir, add the Parmesan, stir, add the asparagus tips and carefully stir.

Cover the saucepan with the lid and let it sit for a couple of minutes. Serve.


TWO TOMATO JELLY

What inspired me to make this tomato jelly was the need to prepare something healthy, with local ingredients, and because of my family’s cholesterol test results. It is ideal for a dinner with a big group because in can be made a day or two in advance, and it can make all our dining companions happy: it is vegetarian, vegan, gluten-free, lactose-free….and light.

The xanthan gum is not essential, it is just a stabilizer and makes the colours more vivid, but it can also be a strong laxative if you overdo it, so be careful or avoid using it.

The addition of fennel and Sambuca liqueur is a touch of Rome, suggested by visiting Chef Fabio Campoli at the Florence Metro Academy.

Prep Time: 5 minutes | Cooking Time: 25 minutes | Total Time: 30 minutes | Yield: Makes 4 servings.


Ingredients


For the yellow jelly

  • 14 oz (400 g) yellow cherry tomatoes
  • 1 oz (20 g) onion, finely minced
  • Some wild fennel leaves
  • 1 tbsp Sambuca (star anise liqueur)
  • 1 tbsp olive oil
  • 1 pinch xanthan gum
  • 1 tsp agar-agar

For the red jelly

  • 14 oz (400 g) red cherry tomatoes
  • 1 tbsp olive oil
  • 2 garlic cloves, peeled
  • 1 pinch chili pepper
  • 1 tsp agar-agar
  • 1 pinch xanthan gum


Instructions


In a saucepan, sauté  the onion in the olive oil and add the yellow tomatoes when the onion is golden. Add salt, cook for 10 minutes and add the Sambuca and fennel. Add the agar-agar and the xanthan gum and mix carefully.

Wet 6 small moulds and pour the liquid into each of them through a sieve. Place the moulds in the fridge and let cool for an hour.

In another saucepan, sauté the garlic cloves in the olive oil. When they are golden, discard them and add the red tomatoes. Add the chili pepper, season with salt, and let it simmer for 10 minutes.

Add the agar-agar and the xanthan gum and mix carefully. Remove the moulds from the fridge, Pour the liquid into each mould through a sieve and put back in the fridge.


A HERETICAL IMPERIAL SOUP

Imperial soup has an Austrian origin, and was introduced to Emilia-Romagna by Marie Louise, Duchess of Parma, the second wife of the Emperor Napoleon I. As usual, this soup which can be traced back to Krinofel, went through a major process of adjustment to adapt to local ingredients. Yet, this recipe is “heretical” in a country where caconic recipes are considered with religious devotion: the traditional preparation includes semolina and butter, as Marcella Hazan shows in her Marcella’s Italian Kitchen, which my mum replaced with ricotta cheese.
This soup is therefore lighter and gluten-free, not a bad option for celiacs, still extremely tasty and comforting. Cooked and served in a sumptuous meat stock, it is a luscious dish, a festive delicacy once offered during the Christmas and Easter festivities, but now quite common at Sunday lunches.


Prep Time: 5 minutes | Cooking Time: 20 minutes | Total Time: 25 minutes | Yield: Makes 8 servings.


Ingredients

  • 1 lb (500 g) ricotta cheese
  • 3 eggs + 1 yolk
  • ½ teaspoon salt
  • ⅛ teaspoon freshly grated nutmeg
  • 1 cup (110 g) freshly grated Parmigiano Reggiano
  • 8 cups (2 L) meat stock

Instructions

Mix all the ingredients (except the meat stock) in a mixer. Preheat the oven at 350 F (180 F)

Pour the ricotta mixture into a baking pan lined with parchment paper and bake for 20 minutes.

Towards the end of cooking, preheat a grill. Remove the ricotta mixture from the oven and finish under the grill until golden.

Remove from the oven and transfer from the baking pan to a cutting board or countertop to cool. When lukewarm, cut into ½-inch squares.

Bring the stock to a boil. Drop in the cubes, cook them for 3 minutes, then turn off the heat and let rest for another 3 minutes before ladling into soup bowls and serving.


Note: You can freeze them when baked and cut. Just pour them into the stock while still frozen.


ROMAN-STYLE CHICKEN WITH BELL PEPPERS

This chicken with bell pepper recipe is truly a typical summer one. The lively colours of the peppers and tomato create a unique blend that you can really appreciate only if you can find fresh sun ripened vegetables.

It is a typical Roman dish, and there is a whole generation of Roman’s who are in their sixties that can still remember meals eaten on the beach, with their mums bringing this pot wrapped in a dish-cloth.

Nowadays, modern recipes add more ingredients, rosemary, sage and garlic in the chicken, and later bell peppers are added in the same pot.

I preferred following an “old school one”, I do not like the idea of adding rosemary and sage to peppers, I think that my recipe is simpler but better.

If you are interested in watching a short video shot in the 1960s, you’ll find some scenes interesting to watch. Do not even make the effort to try to understand it, the cook speaks with a “Roman dialect”, and do not even think of touching or biting vegetables and fruits in the market, or the police will fine you and the vendor… hygienic rules have changed a lot since then.

I love the idea of cooking the meat and the vegetables apart, and joining them in the last 10 minutes of cooking.


Prep Time: 30 minutes | Cooking Time: 2 hours | Total Time:  2 hours and 30 minutes | Yield: Makes 4 servings.

Ingredients

  • 1 medium-size chicken, chopped into pieces
  • ½ medium onion, finely chopped
  • 3 bell peppers, red or yellow, chopped.
  • ½ glass of white wine
  • 7 tbsps. EVO oil
  • 1 tin  finely chopped tomatoes

Instructions

Brown the chicken pieces in a heavy pot with 4 tablespoons of olive oil. Once the meat is golden brown, add the wine and season the meat with salt and black pepper. Allow the wine to evaporate. It is important to add salt and pepper with the wine because it enhances the flavour and you use less salt. Wait until the wine has completely evaporated before adding the chopped tomatoes. Cook over medium low heat for a couple of hours with the lid on, and add some water or stock if needed.

In another pot sauté the onion with the remaining  oil, and when it becomes golden add the peppers. Season with salt and black pepper. Cover with the lid and let it cook for half an hour. Remove the lid and let it cook for another 20 minutes, then add them to the pot with the chicken and cook meat and peppers together for 15 minutes.


CHICKPEA FLATBREAD: THE CONQUEST OF THE TYRRENIAN SEA

Chickpea flatbread is a humble but delicious dish, with its origins dating back to ancient Greek and Roman times.   On the Tuscan coasts it is called Cecina, Farinata in Liguria, and is a common dish on the coasts of the Mediterranean, where it was spread by Ligurian sailors.

Porridges and legumes were commonly in use in the Ancient Mediterranean, and it is now common knowledge that this recipe was introduced during the Middle Ages by the Maritime Republics of Pisa and Genoa. The legends which recount the birth of this recipe are fascinating: the first narration recalls the siege of Pisa in 1005, when the Pisan fleet was in Calabria to help its inhabitants, which had been attacked by Saracens. Some Arabic vessels pointed North and assaulted Pisa. Its desperate citizens reacted to the attack, hurling anything they could grab on the attackers. Almost anything was hurled on the heads of the Saracens, furniture and food too; sacks of chickpeas, which were stepped on and mixed with boiling olive oil, among other things.

When the attackers left, the hungry citizens tried to salvage their properties, and the chickpea flour, which had been mixed with olive oil. At the time, wasting food was not an option, and the citizens tried to recover the slop, which had dried in the sun. The citizens called it “Pisa gold” referring sneeringly to the attempts of the Arabs to seize the city’s riches.

Another legend refers to an ensuing battle, the one in Meloria in 1248. Genoa won over Pisa and took the Tuscan sailors as hostages. The Ligurian galleys were involved in a storm, and the sacks of chickpeas and vases of olive oil were thrashed in the hold and mixed with sea water, making a slop which was served to the sailors in wooden bowls. Some of them refused to eat it, but the bowls were left in the sun, which dried and cooked the gruel, making a delicious dish.

Another version tells of the effort to spread the slop on sea rocks, in order to dry it, but the result was still the same; the following and decisive result is added by the cooking the mixture  in a wood burning oven, which is the real secret of its excellence.

Prep Time: 5 minutes | Cooking Time: 25 minutes | Total Time: 30 minutes + 5 hours standing | Yield: Makes 4 servings.

Ingredients


  • 1 1/3 cups (150 g.) chickpea flour
  • 1 teaspoon sea salt
  • 4 tablespoons olive oil, 2 for the batter and 2 for the pans
  • 2 cups water, room temperature
  • black pepper
  • 1 baking pan, in steel or copper, diameter 13 inches (32 cm)


Instructions


In a bowl, gradually mix the flour with water, cover with a film and let it sit for 4-5 hours, mixing it every half hour.

The flour will produce impurities which make a kind of foam and must be discarded, using a slotted spoon.

This procedure is used in Liguria, the Tuscans are much quicker and mix all the ingredients together almost immediately and bake them, without the sitting time.

After the resting time, add salt and olive oil to the mixture and pour it into a baking pan, and put into a pre-heated oven at 425 F (220 C) for 10 minutes in the lower part of the oven, then move it to the upper part and cook for 10 to 15 minutes, until it is light brown.

An excellent addition can be spring onion, fresh parsley, Italian sausage, or aromatic herbs like rosemary, mixed to the batter before baking them, together with salt and oil.


IMPERIAL MILK! THE FESTIVE DESSERT

This Imperial Milk is a family recipe and originates from what Italians traditionally call “Portuguese Milk” or what is more internationally known as “crème caramel”. It goes by different names and is very common in all Western cuisines.

The ingredients are simple: eggs, sugar, milk, vanilla combined in a pleasant dessert, which is given a unique touch thanks to the addition of finely ground almonds and Amaretto cookies. This finishing touch was conferred by my great-grandmother who  used a coal burning range. She had to perfectly regulate the coal inside the oven and cooked the Imperial Milk by placing burning embers on the mould’s metal lid.

This dessert was extremely popular in European restaurants during the last decades of the twentieth century, probably due to the convenience for restauranteurs, who could prepare it quite in advance and to keep it until clients requested it.

The basic ingredients of this recipe bring back the use of eggs and milk, combined to make use of what were considered medicinal virtues of eggs since ancient times. During the Middle Ages these ingredients were appreciated because of the need to eat meatless alternatives during fasting periods, especially during Lent.  Nevertheless, in Spanish-speaking countries, the attention is focused on the eggs, “flan de huevo” or more simply “flan”, and not on the milk.

Prep Time: 30 minutes | Cooking Time: 1 hour + 5 minutes | Total Time: 1 hour + 35 minutes | Yield: Makes 8 servings.


Ingredients


  • 4 cups whole fat milk
  • ½ cup Peeled almonds
  • 4 Amaretti cookies
  • ½ cup white sugar
  • 7 medium eggs, room temperature
  • 1 vanilla bean
  • For the caramel
  • 1 tablespoon water
  • 1/3 cup white sugar


Instructions

Bring milk and vanilla to boil in light medium saucepan. Remove from heat and let it cool down.

Pour the almonds in a baking pan, on parchment) and bake it in a pre-heated oven for 10 minutes at 350 F (180 C) – until pale gold. Let them cool down.

Pour the ingredients for caramel directly in the mold. Protecting your hands with gloves, put the mold over low heat and dissolve the sugar in it. Increase heat to medium-high and bring mixture to boil. Boil without stirring until mixture turns deep golden brown, swirling pan occasionally. Carefully tilt mold to coat bottom (not sides) with caramel.

In a grinder, pour the almonds, the Amaretti and 1 tablespoon of sugar and grind the mix, until it turns into a powder.

With an electric mixer, whisk the eggs and the rest of the sugar until pale. Add the mix of powdered almonds and Amaretti, and the milk through a sieve. Pour the custard in the mold you have prepared.

Place the mold in a baking pan and add enough hot water to it to come halfway up sides of mold.

Bake at 320 F. (160 C) for 1 hour and grill for 5 minutes at 400 F (200 C).

In the case of the Italian Milk Portuguese style, the mould is covered by a lid in order to keep the top of the custard soft. In this case, the almonds and cookies must raise to the top and form a crispy crust.

Run a small sharp knife around edge of custard to loosen. Invert custard onto plate and serve.