SAVORY CHERRY TOMATOES TARTE TATIN
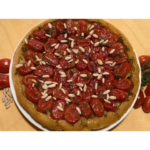
tarte tatin with cherry tomatoes

This cherry tomatoes Tarte Tatin is a very intriguing and tasty appetizer which gives a new perspective to a typical Italian ingredient. in these last years, in Italy too there was the introduction of the recipe of the Taste Tatin with its fascinating story as one of the many masterpieces that was created by a mistake.

There are different versions in Italy, since many decided to replace the sweet apples with confit cherry tomatoes and the crisp pastry, in which Parmigiano cheese and thyme combine to make this heavenly Italian appetizer.

I copied this recipe from a brilliant blogger, one of the best in Italy, Sonia Peronaci  and if we follow the instructions you can make it perfectly every time.

In case you need to serve it to a celiac person or want to try a variation with spring onions there is an interesting variation in the blog.

Bring it to room temperature before serving.


Prep Time: 30 mins | Cooking Time: 35 mins | Yield: it serves 4.


Ingredients 

Ingredients for a 26 cm (10 inch) diameter cake tin,  3-4 cm (2-2,5 inch) high

For the savory shortcrust pastry

  • 250 g (2 cups) multi-purpose flour
  • 40 g (1,4 oz) Parmigiano Reggiano, grated
  • 140 g (5 oz) unsalted butter, very cold
  • 1 medium egg
  • 6 thyme sprigs
  • salt and pepper to taste

For the filling

  • 650 g (1,5 lb) red cherry tomatoes
  • 20 g (1 + 1/2 tbsp or 0,7 oz) white sugar
  • 1 clove garlic
  • 4- 5 thyme sprigs
  • salt and pepper to taste
  • 15 g (0,5 oz) pine nuts

Preparation

The savory shortcrust pastry

In a food processor, add flour and cold butter into small piecesand blend for a few moments until the butter is reduced to very fine crumbs.

Add the grated cheese, egg, thyme, salt and pepper and blend again until all the ingredients are mixed together.

Turn the mixture over on the work surface and knead quickly until the mixture is smooth and homogeneous. Form a ball with the dough and, using a rolling pin, roll it out between two sheets of parchment paper. Once you have created a circle of about 30 cm, place it on a baking sheet and store in the refrigerator to firm.

The filling

Take a cake tin or pan suitable for baking in the oven and cooking on the stovetop with a diameter of 26 cm and add a little extra virgin olive oil to the bottom, a clove of garlic, and thyme leaves. On medium heat on the stove top, sauté and brown the garlic then remove it and put the whole tomatoes in a pan adding sugar, salt and pepper then cook for 10 minutes and then turn off the heat.

Pine nuts

Put the pine nuts in a pan on low heat and cook until golden and crispy, taking care to turn them often so as not to burn them. Let them cool.

Assemble and bake

Take the salted pastry, pierce the surface with the tines of a fork (or with a toothpick) and place it on the cherry tomatoes treading the outer edges towards the inside of the pan as if to embrace them. You can help yourself in this operation with a spatula.

Bake the tarte tatin in a preheated static oven at 175 degrees Celsius for about 35 minutes (or 350 F for 30 mins)

Remove from the oven, wait 10 minutes so that the juice of the tomatoes is absorbed by the pastry and turn it upside down on a serving plate. Add some toasted pine nuts on the surface, a few fresh thyme leaves and serve your slice of tasty salted tarte tatin with cherry tomatoes!



DARK CHOCOLATE CAPRESE CAKE

Dark chocolate Caprese cake

This gluten-free dark chocolate cake was created by accident in Capri in 1920, in a similar way to the birth of Tarte Tatin. The pastry chef was in a stressful day and created this magic cake with chocolate and ground almonds forgetting flour: the result is this magic cake covered by a thin and crunchy crust that contains a moist and soft interior like a chocolate truffle.


Prep Time: 10 minutes | Cooking Time: 30 minutes | Total Time: 40 minutes | Yield: Makes 8 servings.


Ingredients for a 7 IN (20 cm) mold

  • 6,5 oz (g 185) almond flour
  • 4,5 oz (125 g) dark chocolate 70%, crumbled
  • 4,5 oz (125 g) butter, soft
  • 3 medium eggs, room temperature (kept out of the fridge at least 12 hours in advance)
  • 4,5 oz (125 g) white sugar
  • 1 tablespoon dark rhum

Instructions

Melt chocolate and butter in microwave or bain-marie until they are perfectly mixed and smooth.

In another bowl, using a hand mixer, mix for some minutes 3 yolks and 2,8 oz (80 g) sugar, until they are soft and foamy. Add the Rhum, still mixing and the chocolate and butter.

Place half of the sugar into a bowl and the egg yolks. Using a hand mixer on medium-high speed, whisk the ingredients. After a few minutes the mixture will be frothy. Add the Rhum, keep mixing, and the mix of chocolate and butter.

In another bowl pour the egg whites and the remaining sugar. Make sure that the whisks are clean, otherwise the egg whites will not whip.

After a few minutes the egg whites will be shiny and frothy: you have to whip them stiff. When all preparations are complete, preheat the oven to 340°F (170°C) in convection mode and start combining them: fold a third of the whipped egg whites then a third of the almond flour into the egg yolks and chocolate mixture using a spatula, stirring gently from bottom to top. Add another batch (one third of the egg whites and one third of the dry ingredients) and continue until you get a uniform texture.

Pour the smooth and creamy mixture into a buttered 7-inch (20 cm) round cake mould already buttered and floured with potato starch. Carefully level the surface and bake in a convection oven at 340°F (170°C) for about 45 minutes.

Once baked, let the cake cool down in the mould, then turn it upside down to unmould it. Then turn it over again on a plate lined with baking paper and let it cool completely. Once cold, turn the cake upside down one last time, remove the baking paper and dust the surface with powdered sugar.


SAVOURY PIE WITH LEEKS, SQUASH AND CHESTNUT

Savoury pie with leeks, squash and chestnut

A gorgeous pie that increases the freshness of local and seasonal products like squash, leeks and chestnut with a twist given by Phyllo pastry.

Not a personal creation, but a recipe I stole from Cristina Lunardini, an excellent Italian chef, a Romagnolo like me, who I admire, a model to me.

Fresh vegetables which can brighten up our Thanksgiving table or a rainy Sunday brunch; leeks, chestnuts and squash are offered in a new combination, a quite intriguing pie. With this dosage you can make two, you can serve them still warm from the oven or cook and freeze.

Prep Time: 30 minutes | Cooking Time: 50-60 minutes | Total Time: 90 minutes | Yield: Makes 12 servings.

Ingredients:


  • 10 sheets of Phyllo pastry, thawed if frozen
  • ¼ cup (35 g) corn starch
  • 2¼ cups olive oil or unsalted butter, melted if you cannot find good quality olive oil

Ingredients for the filling


  • 3 tablespoons olive oil
  • 2 leeks, cleaned and cut into rings
  • 0,65 pounds (300 g) butternut squash, peeled, seeded, and grated (using the biggest side of a four-sided grater) or finely chopped
  • 7 oz (200 g) chestnuts, boiled and peeled
  • 7 oz (200 g) creamy cheese (possibly chèvre) or Robiola cheese
  • ½ cup (125 ml) milk
  • 2 eggs
  • 2 oz (60 g) grated cheese
  • Sea salt and white pepper, freshly milled

Special equipment

2 plum-cake molds

Instructions

In a pan, brown slightly the leeks and add the squash as they turn into light gold (no more then 10 minutes, as all ingredients will be properly cooked in the oven)

Preheat the oven to 350°F (180 C).

Butter or oil a plum-cake mould.

In a bowl beat eggs with grated cheese, the creamy one and milk. Add salt and pepper and crumbled chestnuts.

Unfold the sheets of phyllo dough, lay the stack on a work surface, and cover with wax paper and then a damp kitchen towel to keep it from drying out. Remove 1 piece of phyllo, place it in the mold, and brush it with some oil (or butter). Continue in the same way with the phyllo and oil/butter until you have used the other 4 sheets of phyllo. Repeat with the other mold.

Move the filling from the pan to the bowl and fill the pies. Cover the tops with the flaps of the phyllo dough, intersecting them and making a kind of decorative pattern. Brush again with some fats.

Bake for 30-40 minutes.

Still excellent if served the day after, warm.


TAJARIN WITH TRUFFLE

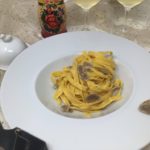
Tajarin pasta with truffle

Wider than “angel’s hair” pasta but thinner than tagliatelle noodles, tajarin (tagliolini noodles in the  Piedmont dialect) were made in the Langhe and Monferrato area farmsteads, in the Piedmont region. From the 15th century, tajarin spread throughout Piedmont, as related in early chronicles. 

It is a festive dish, enjoyed mainly during important celebrations. The generous quantity of
egg yolks in this amazing pasta makes it a “rich” dish, not the best choice
during the working week. Purists consider tajarin to be genuine when it
is made with at least 30 egg yolks per kilo of flour.

I enjoyed tajarin in Alba, a town in Piedmont that is famous for its sophisticated cuisine and famous “white truffle”. 
The restaurant’s pièce-de-résistance was tajarin with white truffle
finely sliced with the special truffle slicer (done by the waiter at my table), tossed with Malga butter (a very fresh rich butter made in a shepherd’s cottage in the mountains). I made my own butter at home: I bought fresh whipping cream and put it in the bowl of a stand mixer, and whisked it at maximum speed until the fat content emulsified. Then I picked up the butter with wet hands and rolled it into balls which I plunged into a bowl of ice water. It only takes few
minutes.


Prep Time: 15 minutes | Cooking Time: 5 minutes | Total Time: 50 minutes | Yield: Makes 2 servings.

Ingredients


  • 7 egg yolks (if the dough is too dry, you can add a few tablespoons of egg white)
  • 2 cups (250 g) all-purpose flour
  • 3 tbsp (40 g) butter
  • 1 tin of crushed tomato 

Instructions

  On a wooden pastry board, pour the flour into a mound, make a hole in its centre and drop the egg yolks into it.

Mix by hand to make a dough that you are going to roll out using a rolling pin.

Let the dough sit for at least 30 minutes, wrap it in cling film or, even better, cover it in a glass bowl.

Roll the dough into a sheet about two millimetres (1/24-inch) thick. Let it dry for at least an hour and a half (depending on the season, in summer 15 minutes are usually enough. The sheet of dough must be dry enough not to stick when you roll it but still flexible to be rolled on itself without breaking).

Flour it lightly, fold a few times to form stacking layers and, using a knife, cut fettuccine about 2 millimetres wide (1/24 inch).

Boil them in salted water for a couple of minutes if they are fresh. If they are frozen, put them directly in the boiling water without thawing, and add a minute to cooking time.

Meanwhile, melt the butter in a pan, add the drained pasta and 3-4 tablespoons of cooking water, mix and serve. Slice the truffle directly on pasta in the dishes. 


OIL BREAD, GENUINE AMUSE-BOUCHE

olive oil bread

Italian bread is famous for being based exclusively on flour and water, yet this recipe, typical of nothern Italy, includes olive oil in its dough. The presence of fats creates a very soft bread, which is easy to be preserved in the foggy climate of Po valley. Moreover, olive oil can be replaced by butter or suet. In the last case, suet helps to clean the mouth if accompanying cold cuts like salami or prosciutto. It sounds incredibly odd, but fats “refresh” your mouth.

Anyway, if you prefer to make simple but genuine appetizers, you can bake these little amuse bouche, and spread them, still warm, with vodka butter and smoked salmon.

NB: this is a small quantity, just enough to make these bite-sized snacks for a party. If you double the ingredients you can make a very tasty bread, which can last even a week, even longer if you keep it in a plastic bag in the fridge and heat it up in the oven for a few minutes.

Prep Time: 30 minutes | Cooking Time: 10 minutes | Total Time: 40 minutes (+ 2 hours for leavening) | Yield: Makes 6  servings.

Ingredients

  •  1 cup (250 g) bread flour
  •  1 tsp (6 g) active brewer’s yeast
  • 1 tsp (6 g) sea salt
  • 2 tbsp + 1 tsp (35 ml) olive oil
  • 1 tbsp + 1 tsp (20 g) sugar
  • ½ cup + 2 tbsp (150 ml) cold water

Preparation

Add both flours, yeasts, and water to the bowl of a stand mixer. Knead it with the dough hook in place. You can also do it by hand in a bowl, but the process takes around 14 minutes of work.

Add the sugar a bit at a time, and when it is well kneaded, add the salt, again in several batches, slowly. Finally, add the oil, slowly. When the dough sticks to the dough hook in a ball, remove it and knead it on a surface sprinkled with flour.

Place the dough in a floured bowl, cover with cling film, and let it rise for 45 minutes. Times vary depending on the time of the year and how warm the kitchen is. At my house, the winter temperature is around 19 C (66 F), so I prefer to move the bowl to a warm oven with the light on.

After the dough has doubled in volume, roll it with the rolling pin, and cut out small circles.  I use a sherry glass, 4 cm in diameter. Roll all the pieces in the palm of your hands, until you create little balls. Make sure to use the remnants of the cuts, or you’ll have to knead them again and make them rise.

As you make the balls, put the on a baking sheet covered with parchment paper. Cover with cling film and leave them to rise for 40/60 minutes.

Discard the cling film and cook in a pre-heated convection oven for 8 to 10 minutes at 375 F (190 C).


MINI SAVOURY PANETTONI

mini savoury panettoni

These mini savoury panettoni are a bit time-consuming but not hard to do, you can decide whatever stuffing you love. The classic recipe included prawns with cocktail sauce, smoked salmon with cream cheese and chives and lemon zest. Or cold cuts and cheeses, or vegetarian fillings.

You can choose whatever filling you love.

Prep Time: 30 minutes | Cooking Time: 20 minutes | Total Time: 50 minutes (4 hours for cooling down) | Yield: Makes 6  servings.

Ingredients

  • ¼ cup (50 ml) warm milk
  • 13 g fresh baker’s yeast or 4 g dry active yeast
  • 1 egg, beaten
  • 3 ½ tbsp (50 g) butter, room temperature, cut in small pieces
  • 1 cup (240 g) bread (Manitoba) flour
  • 1/2 tbsp honey
  • 25 ml water
  • 1 ½ tbsp (20 g) white sugar
  • Butter for the tin
  • 4 tbsp fresh cream or an egg yolk + some milk for glazing

Preparation

Add the warm milk, honey, and water to the bowl of a stand mixer fitted with a dough hook attachment on medium speed. Add the yeast and, after a minute, the egg.

Then add the flour, and when it is well mixed, add the sugar, and finally the salt. If the dough is too dry, add some water. The total time including the kneading of the dough takes around 15 minutes.

Let the dough sit in a deep bowl and cover with plastic wrap. If the temperature in your kitchen is around 77 F (25 C) let it rise for 2 hours. If your temperature is around 66 F (19 C) like in my kitchen, add half an hour.

After the dough has doubled, divide it into 6 balls and knead it, bending the folds under each ball.

Butter the muffin tin and place one ball in each hole. Let it rise again for 2 hours, covering with plastic wrap.

Modify the rising time according to the temperatures in your kitchen.

Pre-heat the oven to 350 F (175 C).  Using a pastry brush, coat the balls with fresh cream, or an egg yolk mixed with 2 tablespoons of milk. Bake for 20 to 25 minutes.

When the pannettoni reach room temperature, move to a cooling rack. They will be firm enough to be cut in thin slices the next day. Calculate making 5 cuts, top included. Fill the layers every 2 cuts, in order to make a sandwich. Choose your favourite canapé fillings. Once you have finished, make at least one vertical cut.


CAULIFLOWER GRATIN

Cauliflower is normally not a very exciting dish, but you can give it some pizazz thanks to this recipe: a crispy and flavourful gratin turns a conventional vegetable into a real treat.

This recipe uses the same ingredients as a Mornay sauce, but is a bit lighter because there is no cream added. If you do not have Grana Padano or Parmigiano cheese, add some other cheese that you love, as long as it is not too strong so that it does not overwhelm the cauliflower’s flavour. The gratin needs Grana Padano or Parmigiano though, to which you could add a bit of grated bread if you want to make it even crispier.

Italian sformato, also known as flan, can be prepared with a variety of vegetables. This cauliflower version was once prepared in the French cuisine tradition. The cauliflower was puréed with the same sauce ingredients as our recipe, placed in a fluted pan baked in bain-marie in the oven. This type of recipe dates back to a time when Italians cooked their vegetables until they had no texture, taste or nutritional value left. Thank goodness times have changed!

Cauliflower is a very ancient vegetable in Italian cuisine, already mentioned in the 1st century AD by Pliny the Elder, who included it among his descriptions of cultivated plants in his Natural History treatise. This sauce adds a bit of fat to an amazing vegetable, which is low in calories, has no fat, but it is an incredibly healthy choice. It is rich in sodium, dietary fiber, vitamin C, vitamin K, calcium, iron, potassium, and magnesium. Last, but not least, since it is mainly composed of water, cauliflower can help keep you hydrated. The list of benefits is not finished yet, since this veggie has a group of substances known as glucosinolates. During digestion, these substances are broken down into compounds that may help prevent cancer , since they help protect cells from damage and have anti-inflammatory, antiviral, and antibacterial effects.

Prep Time: 10 minutes | Cooking Time: 25 minutes | Total Time: 35 minutes | Yield: Makes 6 servings.

Ingredients


  • 1.2 kg (2 lbs) cauliflower florets, washed
  • 1 L (4 cups) milk
  • 80 g (⅔ cup) flour
  • 80 g (cup) butter + more for the gratin
  • Salt
  • 50 g (1.5 oz) grated Grana Padano or Parmigiano cheese
  • 2 egg yolks
  • ½ tsp freshly grated nutmeg
  • 2 tbsp olive oil

Instructions


Boil the cauliflower florets in salted water for 15 minutes. If you have a steamer, even better.

In the meantime, make the bechamel sauce.

Drain the cauliflower when it is cooked but still firm, since it will be baked. Move the florets to a bowl.

Heat the milk.

In a saucepan, melt the butter, add the flour and stir. When it begins to thicken, begin to pour the milk in batches, stirring constantly until you finish. Add the nutmeg, yolks, salt, and ⅔ of the Grana Padano cheese to the bechamel, and stir, mixing thoroughly. If there are any lumps, use a hand blender. Toss the cauliflower with the sauce to coat. Let cool for 5 minutes.

Pre-heat the oven to 200° C (400° F).

Brush a casserole dish with oil using a pastry brush.

Move the cauliflower mix to the casserole and sprinkle the remaining Grana Padano cheese and dot with bits of butter on top.

Bake for 20 minutes until the top turns golden and serve warm.


ASPARAGUS RISOTTO, A SPRING TREAT

This risotto recipe is typical of Tuscany and Northern Italy, where asparagus is a symbol of Spring. I use a local asparagus variety that is smaller but tastier than bigger varieties. Risotto is a much appreciated first course on Italian tables, and while this recipe can be used with other vegetables, the main steps are the same.

The origin of this dish is quite ancient. News of the cultivation of rice in Italy date back to the 15th century. Rice has come a long way, since it was domesticated from the wild Oryza rufipogon  grass  roughly 10,000–14,000 years ago the middle Yangtze and upper Huai rivers, as archaeological evidence points out.

In Italy, rice was an exotic grain introduced by the Arabs in Sicily, and later by the Aragon Dynasty during their domination of the kingdom of Naples. From there, it slowly spread north, to Tuscany and later to Lombardy, under the rule of Lodovico Sforza. Since the great Leonardo da Vinci was working at his court at the time, some Lombards like to think that Leonardo himself suggested transforming the Lombard marshes into rice paddies, but there is no historical evidence of it. What we know for sure, from diplomatic correspondence, is that rice was cultivated in Milan, and in 1375 Lodovico sent some sacks of rice to the Dukedom of Ferrara as a gift, in order to introduce its cultivation in Ferrara too.

The typical Italian rice is derived from the Japonica variety, more adaptable in the temperate regions of Europe.

In some way, this risotto with vegetables is a variation of more prestigious recipes, like the typical Milanese risotto with saffron, of which we have a recipe by Leonardo. As rice was still an exotic and expensive grain, it was eaten at the courts, and enhanced with other precious ingredients such as saffron, cinnamon, or the addition of savoury meat stock. It later developed into fantastic dishes such as Parmigiano risotto or the Champagne risotto.

Prep Time: 10 minutes | Cooking Time: 30 minutes | Total Time: 40 minutes | Yield: Makes 4 servings.

Ingredients

  • 1 lb (400 g) asparagus, washed
  • 12 oz (300 g) Carnaroli or Arborio rice
  • 4 tbsp (60 g) butter
  • ½ white or yellow onion, minced
  • 2 cups (500 ml) vegetable stock, warm
  • 3 tbsp grated Parmigiano
  • 2 tbsp olive oil
  • Sea salt

Instructions

Steam the asparagus for 10 minutes – they must be crisp.

Cut the tips and set aside. Chop the rest of the asparagus and set aside.

In a saucepan, melt 2 tablespoons of the butter and sauté the asparagus tips for 1 minute. Meanwhile keep the vegetable stock warm.

In another saucepan, melt 1 tablespoon of butter and 2 tablespoons of olive oil and  sauté the onion, stirring often, until golden and very soft, about 8–10 minutes. Add the rice. Stir until the grains become translucent, about 3 minutes. Add the asparagus (not the tips) and ladle in ½ cup of the  broth and simmer, stirring frequently, until completely absorbed, 5–6 minutes.

Cook the rice according to the package instructions, stirring and adding the warm vegetable stock in small ladles as needed.

When rice is cooked al dente, turn off the stove and add the rest of the butter, stir, add the Parmesan, stir, add the asparagus tips and carefully stir.

Cover the saucepan with the lid and let it sit for a couple of minutes. Serve.


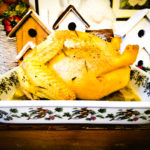
STUFFED CAPON

Capon is a traditional Christmas bird in Europe. It is used either to make a very tasty but fat stock to accompany minestre, such as tortellini, or as a main course, usually stuffed. This stuffing is very simple. I had some cured meats leftover and I thought of giving them a second life. It is a very simple dish, and although there are other ways to cook it, for an Italian Christmas lunch, where there are also children who do not love exotic tastes and spices, this is the ideal cooking method.

Prep Time: 5 minutes | Cooking Time: 25 minutes | Total Time: 30 minutes | Yield: Makes 4 servings.

Ingredients

  • 1 4lb (1.8 kg) capon, cleaned and trimmed
  • Fine sea salt and freshly ground black pepper

For the stuffing

  • 12.5 oz (350 g) ground pork and beef
  • 3 oz (90 g) Emmental cheese
  • 3 oz (90 g) rolled pancetta
  • 3 eggs
  • 2 potatoes, boiled and peeled

For cooking

  • 2 garlic cloves
  • ½ cup (125 ml) dry white wine
  • 30 g butter
  • 4 tbsps. olive oil
  • 4 sage leaves
  • A sprig of rosemary
  • 2 ladles of chicken broth.

Instructions

Remove the giblets from the capon. Rinse out the cavity with cold water and pat it dry. Season it with salt and pepper.

Add all the ingredients to a food processor and mix. If you like the giblets, coarsely chop them and add to the stuffing.

Stuff the capon and sew the cavity. Put the capon in a big saucepan, brown the capon in butter and olive oil, with the aromatic herbs. Roast it for 20 minutes, then turn it on the other side and roast it for another 20 minutes. Add the wine and season with salt and black pepper to taste. Cook for two hours, basting and turning very carefully, to avoid the skin from breaking, adding some broth and cooking on a medium-low temperature.

To serve the capon, present it at the table whole, then carve it. Remove the stuffing in one piece if possible and slice it.


FIG COOKIES

This fig cookie recipe brings out the magic flavour of an incredible, sugary fruit. Figs are at their best at the second part of August and the beginning of September, and if you have the possibility to buy them or better yet get them ripened on the tree, you are a very lucky person. The filling could be replaced by fig jam, but it would not have the same incredible taste enhanced by lemon zest and almond flour, which create an unmistakable taste.

Since the flour reacts differently depending on the country of origin and the percentage of gluten, it is difficult to be precise. Moreover, the size of the egg can also contribute to a great variation. Add one or two tablespoons of milk to the pastry if the dough is too dry.

Prep Time: 5 minutes | Cooking Time: 35 minutes | Total Time: 40 minutes | Yield: Makes 4  servings.

Ingredients for the shortcrust pastry

  • 1 cup (140 g) multi-purpose flour
  • ¼ cup (40 g) corn starch
  • 1½ tbsp (10 g) almond flour
  • 1 tsp (3 g) baking powder
  • ¼ cup (50 g) white sugar
  • 2 tbsp (60 g) butter
  • 1 egg
  • 1 tbsp (15 ml) milk

Ingredients for the filling

  • 9 oz (250 g) fresh figs, peeled and chopped
  • 2 tbsp (30 g) white sugar
  • ½ lemon zest, grated
  • 3 tbsp (20 g)  almond flour

Instructions for the shortcrust pastry

In a mixer, mix all the dry ingredients with the butter until it crumbles. Place in a bowl or on a marble surface and knead with the egg and milk. Wrap in plastic wrap and let it sit in the fridge for 30 minutes.

Instructions for the filling

In a pot, cook the sugar, figs and lemon zest together for 10 minutes. When it cools, add the almond flour and mix again.

Roll the shortbread pastry between two sheets of parchment paper. Cut the pastry edges into a rectangle, then cut again into two rectangles. Place the filling in the centre of each rectangle lengthwise and seal it, overlapping the two edges.  Move the two rolls to the fridge and let sit for 15 minutes.

Heat the oven to 350 F (180 C) Bake the cookies for 25 minutes and cut them only when they reach room temperature.