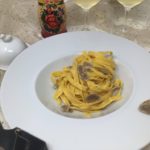
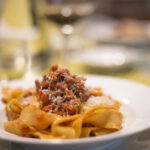
Tagliatelle alla Bolognese: A Legend of Golden Curls and Romagnolo Traditions

Authentic homemade Tagliatelle alla Bolognese with Romagnola meat sauce, served on a traditional plate.

The Story: A Renaissance Obsession


In early 1502, Italy witnessed one of the most extravagant spectacles of the Renaissance: Lucrezia Borgia’s wedding procession. On her way to Ferrara to marry Alfonso d’Este, she traveled with a massive entourage of 600 horses, 150 mules, and a court of musicians and aristocrats.


The journey was famously slow, not just because of the logistics, but because of Lucrezia’s beauty routine. She was renowned for her long, shimmering blonde hair, which she insisted on washing every eight days. These “hair days” were no small feat—they required a full day of rest for the entire procession, much to the frustration of her father, Pope Alexander VI, who was anxious for the wedding to proceed. But for Lucrezia, her curls were her crown.


The Invention of the Golden Ribbons


As the procession passed through the lands of Bentivoglio in Bologna, the city’s lord commissioned his master chef, Zefirano, to create a banquet worthy of the bride.


Captivated by those legendary curls that had delayed a papal procession, Zefirano took a sheet of golden egg pasta and cut it into long, silky ribbons to mimic Lucrezia’s hair. He essentially created the world’s first Renaissance “egg-stensions.”Thus, according to legend, Tagliatelle were born—a dish created from an obsession with beauty.


Where Nobility Meets the Heart: Nonna’s Kitchen


But while a chef in a palace gave Tagliatelle their shape, it was the grandmothers in the countryside who gave them their soul. A pasta born from such a noble inspiration deserves a sauce with real character—not a delicate courtly cream, but a bold, deep, and honest Ragù.


This is where my Nonna from Romagna enters the story. If Lucrezia provided the elegance, my grandmother provided the heart. Her kitchen followed the strict, unwritten rules of the late 1800s. She didn’t cook for a princess; she cooked for a family that demanded flavor, substance, and tradition.


The Heritage of the Pot


My grandmother’s version is a tribute to the bold flavors of our land. She taught me that a great Ragù is an exercise in patience. It doesn’t start with the meat, but with the pancetta—it needs its own time to sizzle and render until golden.


While back in the late 1800s her recipe would have featured chicken hearts and livers (common “noble” scraps of the era) and a base of lard, I’ve refined it for the modern palate using high-quality Extra Virgin Olive Oil. However, I’ve kept her most important rule: No milk, and at least 3 hours of simmering. This is how you get that deep, glossy, concentrated flavor that stays true to our Romagnola roots.


The Authentic Recipe (Serves 4)


Ingredients


For the Pasta:


  • 300g (approx. 2 ½ cups) “00” or All-Purpose Flour

  • 3 Large Eggs


For the Romagnolo Ragù:


  • 100g (3.5 oz) Cubed Pancetta

  • 300g (10.5 oz) Ground Beef (coarse grind)

  • 150g (5.3 oz) Ground Pork

  • 50g each (approx. ½ cup) finely minced Onion, Celery, and Carrots

  • ½ cup (120ml) Dry White or Red Wine

  • 300g (10.5 oz) Tomato Purée (Passata)

  • Extra Virgin Olive Oil, Salt & Pepper, Beef Broth (as needed)


Instructions


1. Homemade Tagliatelle


The Dough: On a wooden pastry board, mound the flour and create a well. Crack the eggs into the center. Gradually incorporate the flour, then knead for about 10 minutes until smooth.


  • Pro Tip: Keep the dough close to your waist. Lean into it using your body weight and gravity rather than just your shoulders.

  • The Rest: Wrap in plastic and rest at room temperature for 30 minutes.


Rolling & Cutting: Roll the dough until it is 1 mm thick. Let the sheet (sfoglia) air-dry on the board for a few minutes. It should be dry enough to not stick, but still elastic enough to roll without breaking.


  • The Cut: Once you reach that perfect consistency, gently roll the sheet into a cylinder and cut it into ribbons (approx. 7mm wide) with a sharp knife.

  • The Alternative: If you are short on time, you can cut the flat sheet directly using a traditional pasta pastry wheel(rotella).


2. The Romagnolo Ragù


The Foundation: Add a generous drizzle of Extra Virgin Olive Oil to a hot pot. Once the oil is hot, add the pancetta. Let it fry until golden and crispy—this base is the secret to the entire sauce. The Soffritto: Add the minced onion, celery, and carrot. Sauté until translucent and soft. The Meat: Add the beef and pork. Brown the meat thoroughly; this deep sear is essential for the flavor. (Note: Late 1800s recipes often cited chicken offal as a historical note, but we omit them for a cleaner, modern finish). The Simmer: Deglaze with wine. Once evaporated, add the tomato purée. Lower the heat to a minimum, cover, and simmer for at least 3 hours. Add broth if needed to keep it glossy. No milk is required.


Now it’s your turn! 🍝


I’d love to see how your golden ribbons turn out! If you recreate this recipe, share your masterpiece and tag me in your photos or stories on Instagram.


Have a question about the “sfoglia” or the ragù? Let’s chat over on my latest Instagram post! I’m always there sharing tips and answering all your cooking curiosities. See you in the kitchen!


[Follow me on Instagram https://www.instagram.com/cookingwithcarlottainflorence/]


ICED COFFEE DESSERT

Iced coffee dessert

A fresh coffee dessert, ideal for the summer, and which will be appreciated by everyone. We will be able to serve it to all our guests, either the ones who have special dietary requirements and those who will just appreciate a light and fresh treat.  If coffee makes us a bit too “nervous” we can use the decaffeinated one.


Prep Time: 30 minutes | Sitting Time: 30 mins | Yields: it serves 8.

Ingredients

  • 200 G (1 cup) coffee
  • 10 G (1 tbsp) instant coffee
  • 200 G (1 cup) water, cold
  • 360 G (3 cups) icing sugar, sifted
  • Cocoa powder to sprinkle
  • Ice

Tools

  • 2 bowls, one bigger than the other, kept in the freezer
  • Electric whisk (hand mixer)

Method

After making the coffee, pour it in the small bowl, add sugar and instant coffee when it is still hot, so they melt perfectly, then add the water and put it in the freezer.

Chill for 20 minutes, put ice in the bigger bowl, put the smaller on it and begin to mix using the electric whisk.

Begin to use the electric whisk at minimum speed and gradually increase it until maximum speed is reached. It must be whipped for a total time of 15-20 mins.

Serve in individual glasses or cups and sprinkle with cocoa powder through a sift.

If you do not serve it all immediately, the leftover needs to be whipped again.


SAVORY TARTE TATIN WITH TROPEA SPRING ONIONS

After centuries we are still thanking the Tatin sisters for the famous apple tarte we all know well and love. From this mistake that produced caramelised apples baked with no shortcrust pastry, added later on the top of the fruit when they realised their forgetfulness, incredible variations with vegetables emerged.

This modification of my previous recipe made with cherry tomatoes in another post valorises Tropea onion, a red onion extremely sweet and valuable, typical of the Calabrian village called Tropea (an incredible ancient spot which overlooks the Mediterranean sea).


Prep Time: 30 minutes | Cooking Time: 45 mins | Yields: it serves 8.

Ingredients

For the savory shortcrust pastry (of course, you can buy a shortcrust)

  • 250 g (2 cups) gluten-free flour
  • 40 g (1,4 oz) Parmigiano Reggiano, grated
  • 140 g (5 oz) unsalted butter, very cold
  • 2 medium eggs
  • 6 thyme sprigs
  • salt and pepper to taste

For the filling

  • 900 g (2 lb) red (Tropea) spring onions, cleaned and cut into 2 halves
  • 20 g (0,7 oz) white sugar
  • 1 clove garlic
  • 4- 5 thyme sprigs
  • salt and pepper to taste

Instructions

The savory shortcrust pastry

In a food processor, add flour and cold butter into small piecesand blend for a few moments until the butter is reduced to very fine crumbs.

Add the grated cheese, egg, thyme, salt and pepper and blend again until all the ingredients are mixed together.

Turn the mixture over on the work surface and knead quickly until the mixture is smooth and homogeneous. Form a ball with the dough and, using a rolling pin, roll it out between two sheets of parchment paper. Once you have created a circle of about 30 cm, place it on a baking sheet and store in the refrigerator to firm.

The filling

Take a cake tin or pan suitable for baking in the oven and cooking on the stovetop with a diameter of 26 cm and add a little extra virgin olive oil to the bottom, a clove of garlic, and thyme leaves. On medium heat on the stove top, sauté and brown the garlic then remove it. Arrange the onions, middles uppermost, around the edge of the pan and then fill in the center with the remaining onions. It is important to pack them as atightly as possible – press them down with your hands as you go. Add sugar, salt and pepper then cook for 20 minutes and then turn off the heat.

Assemble and bake

Take the salted pastry, pierce the surface with the tines of a fork (or with a toothpick) and place it on the onions treading the outer edges towards the inside of the pan as if to embrace them. You can help yourself in this operation with a spatula.

Bake the tarte tatin in a preheated static oven at 175 degrees Celsius for about 35 minutes.

Remove from the oven, wait 10 minutes so that the juice of the tomatoes is absorbed by the pastry and turn it upside down on a serving plate. Add some toasted pine nuts on the surface, a few fresh thyme leaves and serve your slice of tasty salted tarte tatin with Tropea onions!


APULIAN CAPONATA

Summer vegetable stew

This Apulian caponata is a version of this one of Sicily’s essential dishes. It is a vegetarian eggplant stew–more like a relish, really–made of eggplant, onions, bell pepper, celery and tomatoes with briny olives and capers.

There are variations of this tasty eggplant dish. Most of caponatas are spiked with vinegar or raisins.

This version was given to me by a dear friend who lives in Prato, but she owns her Apulian origins a fantastic touch with veggies. This ratatouille is baked, and much lighter then the original version with fried veggies.

The addition of Juniper berries and bay leaves to caponata confers it a very unusual taste which, surprisingly enough (usually these herbs are used in game or meat cooking), melts perfectly with this tasty deli.

It is best the next day, so try to make it ahead and store it in the fridge in a tight-lid mason jar. Bring it to room temperature before serving.


Prep Time: 20 mins | Cooking Time: 60 mins | Total Time: 1 hour + 20 mins minutes | Yield: Makes 8 servings.


Ingredients 

  • 4 medium yellow onions
  • 1 yellow bell pepper
  • 1 red bell peppers
  • 3 medium potatoes
  • 1 large eggplant
  • 125 ml (½ cup) EVO oil
  • 10 bay leaves
  • 1 tablespoon black peppercorns
  • 1 tablespoon Juniper berries
  • Sea salt

Instructions


Cut the eggplant in chunks, sprinkle with salt and let drain in a colander.

Halve and deseed the peppers, then roughly cut into large chunks. Do the same with potatoes and zucchini.

Heat oven to 180C/170C (350 F) fan.

Cover two shallow roasting pans with parchment paper, pour in the vegetables except the eggplant, and season with salt.

With a clean tea towel, squeeze the eggplant chunks and add them to the other vegetables.

Spoon two-thirds juniper berries, peppercorns and olive oil and bay leaves (roughly broken into two halves) into the vegetable mixture, toss together, then roast for 40 minutes.

While vegetables are baking, cut the onions in two halves and then into strips.

Put them in a bowl, season with salt and the remaining herbs and olive oil.

After the vegetables have cooked for 40’, add the onion, mix and let it cook for 20’, or until all the vegetables are soft.


DARK CHOCOLATE CAPRESE CAKE

Dark chocolate Caprese cake

This gluten-free dark chocolate cake was created by accident in Capri in 1920, in a similar way to the birth of Tarte Tatin. The pastry chef was in a stressful day and created this magic cake with chocolate and ground almonds forgetting flour: the result is this magic cake covered by a thin and crunchy crust that contains a moist and soft interior like a chocolate truffle.


Prep Time: 10 minutes | Cooking Time: 30 minutes | Total Time: 40 minutes | Yield: Makes 8 servings.


Ingredients for a 7 IN (20 cm) mold

  • 6,5 oz (g 185) almond flour
  • 4,5 oz (125 g) dark chocolate 70%, crumbled
  • 4,5 oz (125 g) butter, soft
  • 3 medium eggs, room temperature (kept out of the fridge at least 12 hours in advance)
  • 4,5 oz (125 g) white sugar
  • 1 tablespoon dark rhum

Instructions

Melt chocolate and butter in microwave or bain-marie until they are perfectly mixed and smooth.

In another bowl, using a hand mixer, mix for some minutes 3 yolks and 2,8 oz (80 g) sugar, until they are soft and foamy. Add the Rhum, still mixing and the chocolate and butter.

Place half of the sugar into a bowl and the egg yolks. Using a hand mixer on medium-high speed, whisk the ingredients. After a few minutes the mixture will be frothy. Add the Rhum, keep mixing, and the mix of chocolate and butter.

In another bowl pour the egg whites and the remaining sugar. Make sure that the whisks are clean, otherwise the egg whites will not whip.

After a few minutes the egg whites will be shiny and frothy: you have to whip them stiff. When all preparations are complete, preheat the oven to 340°F (170°C) in convection mode and start combining them: fold a third of the whipped egg whites then a third of the almond flour into the egg yolks and chocolate mixture using a spatula, stirring gently from bottom to top. Add another batch (one third of the egg whites and one third of the dry ingredients) and continue until you get a uniform texture.

Pour the smooth and creamy mixture into a buttered 7-inch (20 cm) round cake mould already buttered and floured with potato starch. Carefully level the surface and bake in a convection oven at 340°F (170°C) for about 45 minutes.

Once baked, let the cake cool down in the mould, then turn it upside down to unmould it. Then turn it over again on a plate lined with baking paper and let it cool completely. Once cold, turn the cake upside down one last time, remove the baking paper and dust the surface with powdered sugar.


SAVOURY PIE WITH LEEKS, SQUASH AND CHESTNUT

Savoury pie with leeks, squash and chestnut

A gorgeous pie that increases the freshness of local and seasonal products like squash, leeks and chestnut with a twist given by Phyllo pastry.

Not a personal creation, but a recipe I stole from Cristina Lunardini, an excellent Italian chef, a Romagnolo like me, who I admire, a model to me.

Fresh vegetables which can brighten up our Thanksgiving table or a rainy Sunday brunch; leeks, chestnuts and squash are offered in a new combination, a quite intriguing pie. With this dosage you can make two, you can serve them still warm from the oven or cook and freeze.

Prep Time: 30 minutes | Cooking Time: 50-60 minutes | Total Time: 90 minutes | Yield: Makes 12 servings.

Ingredients:


  • 10 sheets of Phyllo pastry, thawed if frozen
  • ¼ cup (35 g) corn starch
  • 2¼ cups olive oil or unsalted butter, melted if you cannot find good quality olive oil

Ingredients for the filling


  • 3 tablespoons olive oil
  • 2 leeks, cleaned and cut into rings
  • 0,65 pounds (300 g) butternut squash, peeled, seeded, and grated (using the biggest side of a four-sided grater) or finely chopped
  • 7 oz (200 g) chestnuts, boiled and peeled
  • 7 oz (200 g) creamy cheese (possibly chèvre) or Robiola cheese
  • ½ cup (125 ml) milk
  • 2 eggs
  • 2 oz (60 g) grated cheese
  • Sea salt and white pepper, freshly milled

Special equipment

2 plum-cake molds

Instructions

In a pan, brown slightly the leeks and add the squash as they turn into light gold (no more then 10 minutes, as all ingredients will be properly cooked in the oven)

Preheat the oven to 350°F (180 C).

Butter or oil a plum-cake mould.

In a bowl beat eggs with grated cheese, the creamy one and milk. Add salt and pepper and crumbled chestnuts.

Unfold the sheets of phyllo dough, lay the stack on a work surface, and cover with wax paper and then a damp kitchen towel to keep it from drying out. Remove 1 piece of phyllo, place it in the mold, and brush it with some oil (or butter). Continue in the same way with the phyllo and oil/butter until you have used the other 4 sheets of phyllo. Repeat with the other mold.

Move the filling from the pan to the bowl and fill the pies. Cover the tops with the flaps of the phyllo dough, intersecting them and making a kind of decorative pattern. Brush again with some fats.

Bake for 30-40 minutes.

Still excellent if served the day after, warm.


THE ROOTS OF ITALIAN CUISINE

Pellegrino Artusi

As our beloved Pellegrino Artusi claimed, “Cooking is a troublesome sprite”.

Clear of any more or less pleasant surprises that can happen to those who decide to measure themselves against the kitchen stove, there are some fundamental principles of Italian cuisine that we take for granted, that prove otherwise, especially if we compare them to foreign experiences.

Science in the Kitchen and the Art of Eating Well is not only the first cookbook for the families of a country recently united in the mid-19th century, but it marks another Florentine record, since it was printed here by the Bemporad publishing company (even if at the beginning of this adventure the Florentines were not very “pleasant” with my fellow countryman).

The title page of the book, ever-present in every Italian kitchen, often stained and tattered, introduces the rules of Italian cuisine that, to this day, we still abide by: cleanliness – thriftiness – good taste.

In Italy, the regulations on food safety and hygiene, both in distribution and food service, are the strictest in Europe, bearing in mind that the European Union has some of the highest standard’s in the world. The use  of antibiotics for livestock, the use of pesticides in agriculture, and the hygiene controls in food production and distribution are extremely strict.

Comparing the allergen list that must be listed on food labels or on restaurant menus, Europe classifies fourteen of them, while the American FDA only recognises eight.

Italian cuisine includes an ample list of “leftover recipes” which, in addition to the traditional meatloaves and meatballs of Western cuisines, adds ingenious pan fried risottos, pasta frittatas, soups and desserts made with stale bread, in addition to frying breadcrumbs to use as a condiment for pasta (not to mention roast meat leftovers and pan juices to make fillings and sauces for mouth-watering stuffed pastas).

As for good taste, Italians are privileged to be surrounded by beauty and art. The relentless search for quality in every detail has led to the development of a kind of instinct and culture passed down from generation to generation of families, an ability to carefully combine foods and beverages, and select raw materials. Our dear Artusi warned us at the time “…always choose the finest ingredients as your raw materials, for these will you make you shine”.

Things have never changed since then; some years ago, the ambassador of Italian cuisine in the UK, Anna Del Conte, reaffirmed the cornerstones of Italian cuisine for her British readers, which she divided into the ten commandments-of-italian-cooking. Among them, the first commandment was the invitation to purchase the best ingredients possible.

What constantly amazes my foreign clients is the ability of Italian cuisine to create unique dishes, rich in flavour and character with very few ingredients. This is possible because the selection of excellent raw materials is combined with constant attention to the dish being prepared from start to finish, subtle seasoning and dosing of spices and herbs, and constant tasting and adjusting.


TAJARIN WITH TRUFFLE

Tajarin pasta with truffle

Wider than “angel’s hair” pasta but thinner than tagliatelle noodles, tajarin (tagliolini noodles in the  Piedmont dialect) were made in the Langhe and Monferrato area farmsteads, in the Piedmont region. From the 15th century, tajarin spread throughout Piedmont, as related in early chronicles. 

It is a festive dish, enjoyed mainly during important celebrations. The generous quantity of
egg yolks in this amazing pasta makes it a “rich” dish, not the best choice
during the working week. Purists consider tajarin to be genuine when it
is made with at least 30 egg yolks per kilo of flour.

I enjoyed tajarin in Alba, a town in Piedmont that is famous for its sophisticated cuisine and famous “white truffle”. 
The restaurant’s pièce-de-résistance was tajarin with white truffle
finely sliced with the special truffle slicer (done by the waiter at my table), tossed with Malga butter (a very fresh rich butter made in a shepherd’s cottage in the mountains). I made my own butter at home: I bought fresh whipping cream and put it in the bowl of a stand mixer, and whisked it at maximum speed until the fat content emulsified. Then I picked up the butter with wet hands and rolled it into balls which I plunged into a bowl of ice water. It only takes few
minutes.


Prep Time: 15 minutes | Cooking Time: 5 minutes | Total Time: 50 minutes | Yield: Makes 2 servings.

Ingredients


  • 7 egg yolks (if the dough is too dry, you can add a few tablespoons of egg white)
  • 2 cups (250 g) all-purpose flour
  • 3 tbsp (40 g) butter
  • 1 tin of crushed tomato 

Instructions

  On a wooden pastry board, pour the flour into a mound, make a hole in its centre and drop the egg yolks into it.

Mix by hand to make a dough that you are going to roll out using a rolling pin.

Let the dough sit for at least 30 minutes, wrap it in cling film or, even better, cover it in a glass bowl.

Roll the dough into a sheet about two millimetres (1/24-inch) thick. Let it dry for at least an hour and a half (depending on the season, in summer 15 minutes are usually enough. The sheet of dough must be dry enough not to stick when you roll it but still flexible to be rolled on itself without breaking).

Flour it lightly, fold a few times to form stacking layers and, using a knife, cut fettuccine about 2 millimetres wide (1/24 inch).

Boil them in salted water for a couple of minutes if they are fresh. If they are frozen, put them directly in the boiling water without thawing, and add a minute to cooking time.

Meanwhile, melt the butter in a pan, add the drained pasta and 3-4 tablespoons of cooking water, mix and serve. Slice the truffle directly on pasta in the dishes. 


OIL BREAD, GENUINE AMUSE-BOUCHE

olive oil bread

Italian bread is famous for being based exclusively on flour and water, yet this recipe, typical of nothern Italy, includes olive oil in its dough. The presence of fats creates a very soft bread, which is easy to be preserved in the foggy climate of Po valley. Moreover, olive oil can be replaced by butter or suet. In the last case, suet helps to clean the mouth if accompanying cold cuts like salami or prosciutto. It sounds incredibly odd, but fats “refresh” your mouth.

Anyway, if you prefer to make simple but genuine appetizers, you can bake these little amuse bouche, and spread them, still warm, with vodka butter and smoked salmon.

NB: this is a small quantity, just enough to make these bite-sized snacks for a party. If you double the ingredients you can make a very tasty bread, which can last even a week, even longer if you keep it in a plastic bag in the fridge and heat it up in the oven for a few minutes.

Prep Time: 30 minutes | Cooking Time: 10 minutes | Total Time: 40 minutes (+ 2 hours for leavening) | Yield: Makes 6  servings.

Ingredients

  •  1 cup (250 g) bread flour
  •  1 tsp (6 g) active brewer’s yeast
  • 1 tsp (6 g) sea salt
  • 2 tbsp + 1 tsp (35 ml) olive oil
  • 1 tbsp + 1 tsp (20 g) sugar
  • ½ cup + 2 tbsp (150 ml) cold water

Preparation

Add both flours, yeasts, and water to the bowl of a stand mixer. Knead it with the dough hook in place. You can also do it by hand in a bowl, but the process takes around 14 minutes of work.

Add the sugar a bit at a time, and when it is well kneaded, add the salt, again in several batches, slowly. Finally, add the oil, slowly. When the dough sticks to the dough hook in a ball, remove it and knead it on a surface sprinkled with flour.

Place the dough in a floured bowl, cover with cling film, and let it rise for 45 minutes. Times vary depending on the time of the year and how warm the kitchen is. At my house, the winter temperature is around 19 C (66 F), so I prefer to move the bowl to a warm oven with the light on.

After the dough has doubled in volume, roll it with the rolling pin, and cut out small circles.  I use a sherry glass, 4 cm in diameter. Roll all the pieces in the palm of your hands, until you create little balls. Make sure to use the remnants of the cuts, or you’ll have to knead them again and make them rise.

As you make the balls, put the on a baking sheet covered with parchment paper. Cover with cling film and leave them to rise for 40/60 minutes.

Discard the cling film and cook in a pre-heated convection oven for 8 to 10 minutes at 375 F (190 C).


A PIGNOLATA IN RED

pignolata struffoli in red

Pignolata, also known nationally and internationally as Struffoli is a very popular dessert in Southern Italy at Christmas time. It is not hard to make but time-consuming, and the best advice I can give is collecting the family around the table in order to roll them into the small marbles.

The traditional dessert is arranged like a pine cone or pigna, from which its name, pignolata is  derived.

There is another recipe, with my mother-in-law’s doses, enough to feed an army, in the best southern tradition. On the other hand, sometimes a bit of innovation can be stimulating, since creativity is a fundamental ingredient of cooking.

I added some raspberry puree which you can make very easily with the fresh ingredients: just blend a cup of raspberries mixed with 2 tablespoons water and press through a sieve.

Prep Time: 50 minutes | Cooking Time: 40 minutes | Total Time: 90 minutes (+ 2 hours for cooling the ganache) | Yield: Makes 6  servings.

Ingredients

For the dough

  • 2 ¼cups  (300 g) all-purpose flour, plus more for rolling
  • 3 eggs
  • A pinch of salt
  • 2 tablespoons (30 ml) Anise or Sambuca liqueur
  • 2 tbsp white sugar
  • 1 organic lemon zest, finely grated

For finishing

  • Vegetable oil (sunflower) for frying
  •  14 oz (400 g) honey
  • ½ cup raspberry puree

For the dark chocolate ganache

  • 8 oz (250 g) semi-sweet baker’s chocolate, chopped
  • ½  cup (125 ml) whipping cream
  • 1 tbsp (15 g) unsalted butter

Preparation

Mix all the ingredients (except the honey and vegetable oil) in a bowl, you can use a stand mixer with a dough hook. Work the dough until it is smooth. This doesn’t take very long: about 3 minutes or 5 minutes by hand.

Let it rest in the bowl, covered with plastic wrap, for 2 hours.

Flour your work surface and turn out your dough. Then divide the dough into 10 roughly equal pieces, each about the size of a golf ball. Take 1 ball and roll it out into a rope approx. 1/2 inch thick, then with floury hands, divide this into about 20 small pieces, and roll each piece between your hands (flouring them again if this helps) to make marble-sized balls.

Fry them (deep frying) in small batches until they are golden and lay the marbles on kitchen paper. When you have finished frying, discard the oil and clean the pan with kitchen paper.

Pour the honey in the pan and, when the honey is warm, tip all of the fried dough balls into it and, using a soft spatula, turn them gently to coat them.

Get out a large plate or cake stand with a slight lip or rim and place a wet glass or a pastry ring on it. Arrange the balls in the shape of a pyramid or a wreath with a serving spoon.

Add the raspberry purée to the honey and mix for 6 to 7 minutes, until the purée is caramelised.

The small balls can then be arranged in individual dessert plates in a random shape or again, into a pyramid or wreath.

Make the Ganache.

In a saucepan, pour the cream and butter and bring to an almost boil. When the cream is simmering and starts bubbling, add the chocolate and switch off the heat. Mix with a whisk and move to the fridge. Let it stand for at least a couple of hours, then move to a piping bag with a wide star tip.

Decorate the plate piping little amounts of ganache.  Add some green candied fruit.