SAVORY TARTE TATIN WITH TROPEA SPRING ONIONS

After centuries we are still thanking the Tatin sisters for the famous apple tarte we all know well and love. From this mistake that produced caramelised apples baked with no shortcrust pastry, added later on the top of the fruit when they realised their forgetfulness, incredible variations with vegetables emerged.

This modification of my previous recipe made with cherry tomatoes in another post valorises Tropea onion, a red onion extremely sweet and valuable, typical of the Calabrian village called Tropea (an incredible ancient spot which overlooks the Mediterranean sea).


Prep Time: 30 minutes | Cooking Time: 45 mins | Yields: it serves 8.

Ingredients

For the savory shortcrust pastry (of course, you can buy a shortcrust)

  • 250 g (2 cups) gluten-free flour
  • 40 g (1,4 oz) Parmigiano Reggiano, grated
  • 140 g (5 oz) unsalted butter, very cold
  • 2 medium eggs
  • 6 thyme sprigs
  • salt and pepper to taste

For the filling

  • 900 g (2 lb) red (Tropea) spring onions, cleaned and cut into 2 halves
  • 20 g (0,7 oz) white sugar
  • 1 clove garlic
  • 4- 5 thyme sprigs
  • salt and pepper to taste

Instructions

The savory shortcrust pastry

In a food processor, add flour and cold butter into small piecesand blend for a few moments until the butter is reduced to very fine crumbs.

Add the grated cheese, egg, thyme, salt and pepper and blend again until all the ingredients are mixed together.

Turn the mixture over on the work surface and knead quickly until the mixture is smooth and homogeneous. Form a ball with the dough and, using a rolling pin, roll it out between two sheets of parchment paper. Once you have created a circle of about 30 cm, place it on a baking sheet and store in the refrigerator to firm.

The filling

Take a cake tin or pan suitable for baking in the oven and cooking on the stovetop with a diameter of 26 cm and add a little extra virgin olive oil to the bottom, a clove of garlic, and thyme leaves. On medium heat on the stove top, sauté and brown the garlic then remove it. Arrange the onions, middles uppermost, around the edge of the pan and then fill in the center with the remaining onions. It is important to pack them as atightly as possible – press them down with your hands as you go. Add sugar, salt and pepper then cook for 20 minutes and then turn off the heat.

Assemble and bake

Take the salted pastry, pierce the surface with the tines of a fork (or with a toothpick) and place it on the onions treading the outer edges towards the inside of the pan as if to embrace them. You can help yourself in this operation with a spatula.

Bake the tarte tatin in a preheated static oven at 175 degrees Celsius for about 35 minutes.

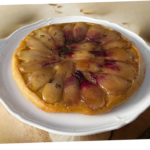
Remove from the oven, wait 10 minutes so that the juice of the tomatoes is absorbed by the pastry and turn it upside down on a serving plate. Add some toasted pine nuts on the surface, a few fresh thyme leaves and serve your slice of tasty salted tarte tatin with Tropea onions!


THE ROOTS OF ITALIAN CUISINE

Pellegrino Artusi

As our beloved Pellegrino Artusi claimed, “Cooking is a troublesome sprite”.

Clear of any more or less pleasant surprises that can happen to those who decide to measure themselves against the kitchen stove, there are some fundamental principles of Italian cuisine that we take for granted, that prove otherwise, especially if we compare them to foreign experiences.

Science in the Kitchen and the Art of Eating Well is not only the first cookbook for the families of a country recently united in the mid-19th century, but it marks another Florentine record, since it was printed here by the Bemporad publishing company (even if at the beginning of this adventure the Florentines were not very “pleasant” with my fellow countryman).

The title page of the book, ever-present in every Italian kitchen, often stained and tattered, introduces the rules of Italian cuisine that, to this day, we still abide by: cleanliness – thriftiness – good taste.

In Italy, the regulations on food safety and hygiene, both in distribution and food service, are the strictest in Europe, bearing in mind that the European Union has some of the highest standard’s in the world. The use  of antibiotics for livestock, the use of pesticides in agriculture, and the hygiene controls in food production and distribution are extremely strict.

Comparing the allergen list that must be listed on food labels or on restaurant menus, Europe classifies fourteen of them, while the American FDA only recognises eight.

Italian cuisine includes an ample list of “leftover recipes” which, in addition to the traditional meatloaves and meatballs of Western cuisines, adds ingenious pan fried risottos, pasta frittatas, soups and desserts made with stale bread, in addition to frying breadcrumbs to use as a condiment for pasta (not to mention roast meat leftovers and pan juices to make fillings and sauces for mouth-watering stuffed pastas).

As for good taste, Italians are privileged to be surrounded by beauty and art. The relentless search for quality in every detail has led to the development of a kind of instinct and culture passed down from generation to generation of families, an ability to carefully combine foods and beverages, and select raw materials. Our dear Artusi warned us at the time “…always choose the finest ingredients as your raw materials, for these will you make you shine”.

Things have never changed since then; some years ago, the ambassador of Italian cuisine in the UK, Anna Del Conte, reaffirmed the cornerstones of Italian cuisine for her British readers, which she divided into the ten commandments-of-italian-cooking. Among them, the first commandment was the invitation to purchase the best ingredients possible.

What constantly amazes my foreign clients is the ability of Italian cuisine to create unique dishes, rich in flavour and character with very few ingredients. This is possible because the selection of excellent raw materials is combined with constant attention to the dish being prepared from start to finish, subtle seasoning and dosing of spices and herbs, and constant tasting and adjusting.


PIGNOLATA, THE CHRISTMAS TRADITION

pignolata struffoli

Pignolata, also known as Struffoli in Naples, is a very popular dessert in Southern Italy, an area that was dominated by Spain for centuries, and its origin is from the region of Andalusia.

These Christmas marble-sized honey fritters are deep-fried and then rolled in honey before being assembled into a cone or a globular wreath.

This dessert belongs to the tradition of “peasant cooking”, and it is about customs, celebration, and sweetness. I decided to make Pignolata for my husband, as it was one of the few Calabrian dishes his mother made that he loved.

Like many Italian Christmas dishes, these fritters are the fruit of a collective effort, of many generations around the kitchen table working together. Rolling these little balls is child’s job, as their little hands are particularly apt to it.

This simple version, with no candied fruit, glacé cherries, or almond dragées is typical of my husband’s family. In other far richer cities like Messina in Sicily, this simple version was despised by the rich. For them, the local pastry chef created a double lemon and chocolate frosting, which could suit the more demanding palates (and bigger budgets) of aristocratic Sicilians. In Naples, the decoration is very multi-coloured, a real visual joy, full of all the most coloured candied fruit and silver dragées.

If you prefer something a bit more original, try the red raspberry version.

Prep Time: 60 minutes | Cooking Time: 30 minutes | Total Time: 90 minutes | Yield: Makes 12  servings.

Ingredients

For the dough

  • 4 ¾ cups (600 g) all-purpose flour, plus more for rolling
  • 6 eggs
  • A pinch of salt
  • ¼ cup (60 ml) Anise or Sambuca liqueur
  • 4 tbsp white sugar
  • 1 organic lemon zest, finely grated

For finishing

  • Vegetable oil (sunflower) for frying
  •  28 oz (800 g) honey

Preparation

Mix all the ingredients (except the honey and vegetable oil) in a bowl, you can use a stand mixer with a dough hook. Work the dough until it is smooth. This doesn’t take very long: about 3 minutes or 5 minutes by hand.

Let it rest in the bowl, covered with plastic wrap, for 2 hours.

Flour your work surface and turn out your dough. Then divide the dough into 10 roughly equal pieces, each about the size of a golf ball. Take 1 ball and roll it out into a rope approx. 1/2 inch thick, then with floury hands, divide this into about 20 small pieces, and roll each piece between your hands (flouring them again if this helps) to make marble-sized balls.

Fry them (deep frying) in small batches until they are golden and lay the marbles on kitchen paper. When you have finished frying, discard the oil and clean the pan with kitchen paper.

Pour the honey in the pan and, when the honey is warm, tip all of the fried dough balls into it and, using a soft spatula, turn them gently to coat them.

Get out a large plate or cake stand with a slight lip or rim and place a wet glass or a pastry ring on it. Arrange the balls in the shape of a pyramid or a wreath with a serving spoon.


CREAMED CODFISH: FROM NORWAY TO VENICE

creamed fishcod

This creamed codfish version is another example of the extreme variety and richness of Italian cuisine: stockfish and salted codfish were introduced to Southern Europe centuries ago, and they were adapted to hundreds of recipes across the Mediterranean.

Creamed codfish is a delicate appetiser which exalts two typical ingredients of Northern Italy, codfish (also popular in all of Southern Europe) and polenta. Yellow or white, hot straight from a copper polenta pot, or sliced and grilled, polenta is an excellent and gluten free food that is delicious in every season.

Even if it is referred to as baccalà (salted codfish) in this venetian recipe, the fish used in this dish is stockfish. Venice was the first city in Southern Europe where stockfish was introduced by the nobleman Pietro Querini in 1432. This gentleman was bound for Flanders, but his merchant ship encountered a terrible storm off the western coast of France. The storm ravaged the ship, and the few surviving sailors, after weeks spent fighting the storm and cold temperatures for weeks, finally drifted on the Gulf Stream far across the North Sea. Stranded on an island off of Norway amid the small Lofoten Islands, they were found by local fishermen and spent months with the Røst inhabitants.

This dramatic incident was the origin of trade between northern Norway and Italy, which made the combination of Norwegian stockfish and Italian cooking possible.

This kind of preparation consists of cod fish dried on wooden racks, where cold-adapted bacteria matures the fish. The word stockfish is a loan word from West Frisian stokfisk (stick fish), possibly referring to the wooden racks on which stockfish are traditionally dried or because the dried fish resembles a stick.

Prep Time: 20 minutes | Cooking Time: 30 minutes | Total Time: 50 minutes (3 hours for cooling down) | Yield: Makes 4  servings.

Ingredients

  • 300 g stockfish, already soaked
  • 4 cups (I L) cold water
  • 3 garlic cloves
  • ¼ cup (50 ml) delicate olive oil
  • 1/3 cup (100 ml) vegetable oil
  • 3 black pepper grains
  • ¼ cup (80 g) milk
  • 3 juniper berries
  • 1 bay leaf
  • Sea salt

Instructions

A day before, infuse two chopped garlic cloves in the combined oils. Filter it and discard the garlic before using it. If you prefer, you can rub the bowl you are going to use the cream the fish with the peeled garlic.

In a pot, add the milk, water, pepper, bay leaf, juniper berries, and the stockfish.

When it reaches a boiling point, reduce the heat and let it simmer for thirty minutes. Turn off the heat and let it cool down in the cooking liquid, until it is room temperature.

Take the stockfish and crumble it, using your fingers, discarding the bones and the skin. Put it in a food processor and finely mince the stockfish.

Move the fish to a stand mixer fitted with a whisk attachment. While whisking, drizzle with the infused oil and a few tablespoons of the cooking liquid, alternating them, and add salt. The stockfish is ready when it has turned into a velvety and soft cream.

Store in the fridge and serve it cold on warm grilled polenta slices.

“Stoccafisso” is a particular way of preparing cod fish which comes from Germany where it is completely dried on a stick from which the name originates: stock (stick) and fisch (fish).


BEANS “ALL’UCCELLETTO” WITH SAUSAGE

In the trattorie of Florence I have heard shelled beans cooked in this way called “fagiouli all’uccelletto”.
(Pellegrino Artusi, Science in the Kitchen and the Art of Eating Well)

This recipe is a typical Florentine way to eat their beloved cannellini beans which have replaced meat for centuries. The name originates from the way small game birds were cooked in Tuscany, seasoned with a generous amount of sage.
The bean’s abundance in vegetable proteins and fibre has nourished Mediterranean populations for centuries. In these times of abundance, they are still quite appreciated.
Beans are an excellent side dish, but you can add sausages to the basic recipe and create an excellent traditional Tuscan main course.
There are many versions of this recipe, some include onion and seasoning. The recipe reported by our Romagna gentleman consists of sage and tomato, I personally love adding garlic.
The first recipe we find in the original cookbook of Italian cuisine is the one which considers beans as a side dish, excellent for accompanying stewed meats. In it, the beans are browned in a substantial amount of oil and sage, and later enriched with tomato sauce. I prefer to use a milder temperature and less oil.

Prep Time: 5 minutes | Cooking Time: 35 minutes | Total Time: 40 minutes | Yield: Makes 4  servings.

Ingredients


  • 500 g beans, already cooked in water with a poached garlic clove, a sprig of rosemary and 3 sage leaves. Reserve the cooking liquid.
  • 4 sausages
  • 2 garlic cloves, peeled
  • 1 tin of crushed tomato
  • 3 tablespoons olive oil
  • Sea salt
  • 10 sage leaves
  • A sprig of rosemary


Instructions

Put a pan on the stove with the oil, sage leaves and garlic. When the oil starts to sizzle, toss in the sausages and brown them, piercing them with the prongs of a fork in order to make them lose their juices.

When the sausages are golden, toss in the beans and season with salt and pepper. Add the tomato sauce to the beans with 2-3 tablespoons of their cooking liquid. Let them simmer for 15-20 minutes without a lid, take them off the stove and serve.


THE BIRTH OF CARBONARA PASTA

Carbonara pasta is a typical Roman dish. Full of taste and very easy to make, its goodness is thanks to quality ingredients. Be that as it may, it seems that originally, the ingredients were different.

Legend has it that in the Rome of WWII, occupied by allied troops, a local innkeeper was asked to make food for some American soldiers who gave him bacon and powdered eggs from their military supplies. The best way to feed a lot of people with few ingredients is making pasta, so the innkeeper combined these few ingredients to make a dish that is big favourite of Lazio citizens, but it is also loved in many countries.

Later, when things got better and it was possible to have local ingredients again, the recipe was enriched with guanciale (cured pork jowl) and fresh, creamy eggs.

To celebrate Carbonara day, I made spaghetti alla chitarra, reminiscent of Roman tonnarelli (a fresh, long egg pasta) and enjoyed this epicurean dish during this period of quarantine with my husband.

Prep Time: 5 minutes | Cooking Time: 15 minutes | Total Time: 20 minutes | Yield: Makes 2 servings.

Ingredients


For the pasta

  • 100 g semolina flour
  • 100 g all-purpose flour
  • 1 egg
  • About ¼ cup water, room temperature

For the sauce

  • 3 tbsp grated Parmigiano Reggiano (I did not have Roman Pecorino)
  • 2 egg yolks
  • 1 egg
  • Black pepper
  • 60 g guanciale (cured pork jowl)

Instructions


On a wooden pastry board, pour the flour in a mound, make a well in its centre and crack the egg into it. Blend by hand, making a dough that you are going to smooth with a rolling pin.  It should be rolled to a 3 mm thickness.  Then cut it into rectangles that will be cut on the chitarra.

Cook the pasta in salted water; if it is fresh, it will cook in a few seconds.

You might need to add some flour if the dough is too wet or some water if it is too dry and impossible to work.

TIPS:

As you work it, keep the dough near your belly, when kneading and rolling.

Lean into the dough as you work, exploit gravity, not your shoulders and arms.

In a frying pan, sauté the guanciale in its own fat. While the water for pasta is beginning to boil, I place the egg and egg yolks in a Pyrex or stainless steel bowl and place it over the pot, whisking them until they are fluffy, gradually adding the cheese and a generous sprinkle of black pepper. Remember to keep the bowl away from direct heat to avoid curdling the egg.

When the pasta is cooked, drain it and toss it in the frying pan with the guanciale. Transfer it to the bowl with the egg mixture. Toss until the egg mixture has coated the pasta  and enjoy.


ASPARAGUS RISOTTO, A SPRING TREAT

This risotto recipe is typical of Tuscany and Northern Italy, where asparagus is a symbol of Spring. I use a local asparagus variety that is smaller but tastier than bigger varieties. Risotto is a much appreciated first course on Italian tables, and while this recipe can be used with other vegetables, the main steps are the same.

The origin of this dish is quite ancient. News of the cultivation of rice in Italy date back to the 15th century. Rice has come a long way, since it was domesticated from the wild Oryza rufipogon  grass  roughly 10,000–14,000 years ago the middle Yangtze and upper Huai rivers, as archaeological evidence points out.

In Italy, rice was an exotic grain introduced by the Arabs in Sicily, and later by the Aragon Dynasty during their domination of the kingdom of Naples. From there, it slowly spread north, to Tuscany and later to Lombardy, under the rule of Lodovico Sforza. Since the great Leonardo da Vinci was working at his court at the time, some Lombards like to think that Leonardo himself suggested transforming the Lombard marshes into rice paddies, but there is no historical evidence of it. What we know for sure, from diplomatic correspondence, is that rice was cultivated in Milan, and in 1375 Lodovico sent some sacks of rice to the Dukedom of Ferrara as a gift, in order to introduce its cultivation in Ferrara too.

The typical Italian rice is derived from the Japonica variety, more adaptable in the temperate regions of Europe.

In some way, this risotto with vegetables is a variation of more prestigious recipes, like the typical Milanese risotto with saffron, of which we have a recipe by Leonardo. As rice was still an exotic and expensive grain, it was eaten at the courts, and enhanced with other precious ingredients such as saffron, cinnamon, or the addition of savoury meat stock. It later developed into fantastic dishes such as Parmigiano risotto or the Champagne risotto.

Prep Time: 10 minutes | Cooking Time: 30 minutes | Total Time: 40 minutes | Yield: Makes 4 servings.

Ingredients

  • 1 lb (400 g) asparagus, washed
  • 12 oz (300 g) Carnaroli or Arborio rice
  • 4 tbsp (60 g) butter
  • ½ white or yellow onion, minced
  • 2 cups (500 ml) vegetable stock, warm
  • 3 tbsp grated Parmigiano
  • 2 tbsp olive oil
  • Sea salt

Instructions

Steam the asparagus for 10 minutes – they must be crisp.

Cut the tips and set aside. Chop the rest of the asparagus and set aside.

In a saucepan, melt 2 tablespoons of the butter and sauté the asparagus tips for 1 minute. Meanwhile keep the vegetable stock warm.

In another saucepan, melt 1 tablespoon of butter and 2 tablespoons of olive oil and  sauté the onion, stirring often, until golden and very soft, about 8–10 minutes. Add the rice. Stir until the grains become translucent, about 3 minutes. Add the asparagus (not the tips) and ladle in ½ cup of the  broth and simmer, stirring frequently, until completely absorbed, 5–6 minutes.

Cook the rice according to the package instructions, stirring and adding the warm vegetable stock in small ladles as needed.

When rice is cooked al dente, turn off the stove and add the rest of the butter, stir, add the Parmesan, stir, add the asparagus tips and carefully stir.

Cover the saucepan with the lid and let it sit for a couple of minutes. Serve.


TANGERINE GELO: A SICILIAN INNUENDO

Tangerine gelo. The mere mention of this dessert evokes a sensation of freshness, citrus scents, and summer nights. Tangerine gelo is a typical recipe of the Sicilian tradition. Whereas its origin has been lost over time it likely has its roots in the Arab-Norman domination, so rich in creativity, pervaded by the scent of oriental spices and citrus fruits. Before the advent of corn starch carob flour was used as a thickening agent.

This tangerine gelo is a very simple and light dessert that uses fresh fruit, offering you the opportunity  to create a dessert that is fresh, seasonal, vegan and perfect for avoiding all kinds of food allergies and intolerances. The use of corn starch adds thickness to the gelatine since traditional gelatines do not work with acidic ingredients. Moreover, not only do you avoid using ingredients of animal origin, but you also enjoy the freshness of tangerines. The same basic recipe can easily be turned into other gelatines with other seasonal fresh fruits, like watermelon and melon in summer, or even with cinnamon.

The tangerine is quite sweet, but the addition of lemon adds an acidic note that is offset by the piped decoration. If you are lactose intolerant, substitute the whipping cream with the lactose free variety, or with sugar pearls if you are vegan.

Prep Time: 10 minutes | Freezing Time: 4 hours | Total Time: 4 hours and 20 minutes | Yield: Makes 2 servings.

Ingredients

For the gelatine

  • 45 g (⅓ cup) corn starch
  • 1 kg (2.2 lbs) tangerines, juiced and filtered
  • 1 lemon, juiced and filtered
  • 55 g (¼ cup) white sugar

For decorating

  • 125 ml (½ cup) fresh whipping cream
  • 20 g  (3½ tbsp) powdered sugar, sifted

Instructions

Pour all the ingredients except the corn starch in a saucepan and put it on the stove. Simmer over low heat for 3-4 minutes, until the sugar has completely dissolved. Add the corn starch, sifting it directly into the saucepan and mix thoroughly.

Pour into glass bowls and let them set in the fridge for at least 4 hours.

For the decoration, chill a medium mixing bowl and whisk in the freezer for 10 minutes before beginning. In the chilled bowl, whisk the whipping cream until it begins to foam and thicken. Add the powdered sugar and continue to whisk until soft peaks form. Do not over-whip. Pour into a pastry bag and decorate the top of the gelatine.


TORTELLINI, THE PASTA INSPIRED BY A GODDESS

The cuisine in Emilia-Romagna is permeated with sexual innuendos, expressed in its iconic stuffed pasta, tortellini. Local legends say that the creation of tortellini was inspired by the goddess Venus herself, who was spotted by an innkeeper while staying at his inn. Stricken by this vision, he rushed to the kitchen, rolled out a sheet of pasta and shaped it like the only part of his beautiful guest’s body he had seen from the lock. Today, the hole in the centre of a tortellino is still called “Venus’ navel”.

I follow my grand-grandmother’s recipe, who was from Modena, and made an all-pork stuffing, whereas in other parts of Emilia they prefer substituting pork loin with beef.

Tortellini are a typical Christmas dish in Emilia, but nowadays you can find them at any time during the winter season.

At Christmas, my family cooks them in a warm capon stock that I prefer preparing one day in advance, in order to refrigerate it in a smaller container overnight to remove the solidified fat from the top of the chilled stock. On normal Sundays, we have tortellini in our traditional meat stock (link).

Making tortellini is quite complicated and time-consuming, and it has always been a team effort. Traditionally, the entire family gathered around the “arzdora” (the mother, the real family boss in Ravenna dialect) to put the filling on the small squares of pasta and shape the tortellini. With their small fingers, women and children were the most capable when it came to sealing the tortellini.

In order to be efficient, the filling and the dough can be prepared one or two days in advance. I love using a piping-bag for the filling, and recently, a chef suggested I refrigerate the dough in a vacuum-bag, since the absence of air in the bag prevents oxidation and the dough from changing colour. Still, it is better to work as a team – at least two skilled people – in order to shape tortellini in time to prevent the sheet of pasta from drying.


Prep Time: 4 hours | Cooking Time: 30 minutes | Total Time: 5 hours | Yield: Makes 10 servings.

Ingredients


For the filling

  • 3.5 oz (100 g) pork loin
  • 1 tbsp dry white wine
  • Sea salt and black pepper to taste
  • 2 tbsp (30 g) butter
  • 1 garlic clove
  • 1 small rosemary sprig
  • 2.8 oz (80 g) Parmigiano Reggiano
  • 3 oz (90 g) Parma ham
  • 3 oz (90 g) Bologna mortadella
  • 2 eggs
  • 1/8 teaspoon nutmeg, freshly grated

For the pasta

  • 6 eggs
  • 4 cups (500 g) all-purpose flour

For the capon stock

  • 1 medium onion, peeled
  • 1 medium carrot, peeled
  • 1 celery stalk
  • Half capon
  • 3 parsley sprigs
  • 4-5 black pepper corns
  • 1 kg (2.5 lbs) various beef cuts used for Italian braised meat like beef tongue, tail, shin bones with meat, marrow bones and bones with a little meat on them, such as oxtail, short ribs, or knuckle bones (cut in half by a butcher)

Instructions

For the capon stock (one day in advance)

Place a large stockpot on the biggest burner. Fill with 4-5 litres/4.5 to 5.5 quarts of cold water (about two-thirds full) and add all the ingredients. Bring the water to the simmering point.

Gently simmer the stock, covered, for 3-4 hours, or even longer if you have time, topping up with water if necessary. Skim the white foam that bubbles to the surface with a slotted spoon.

Strain stock using a fine-mesh sieve and discard bones and vegetables. Let the broth continue to cool until barely warm, then refrigerate in smaller containers overnight. Remove solidified fat from the top of the chilled stock.

For the filling

Add the butter, rosemary, and garlic to a small pan, and sauté the meat. When the meat is roasted externally, add the wine and season with salt and pepper. Cook for five minutes and let it cool down. When it reaches room temperature, coarsely chop and put in a food processor with all the other ingredients. mince at maximum speed until the filling is perfectly blended and is pink in colour. Fill a piping-bag and keep in the fridge. Take it out and keep at room temperature an hour before using it, or it will be too hard to squeeze it out of the piping bag.

For the pasta

On a wooden pastry board, pour the flour into a mound, make a well in its centre and crack the eggs into it. Blend by hand, making a dough that you are going to smooth with a rolling pin.

Divide the dough into two halves, wrap them in plastic wrap and put in the fridge for a couple of hours.

Roll them out, remembering to sprinkle them with flour. Roll each ball of dough into a sheet about 2 mm (1/24 inch) thick.

Cut each dough into small 2-inch (5 cm) squares, and put little piles of filling in each  centre.

Fold the squares into rectangles enclosing the filling. Gently lift one of the long sides against the stuffing at a time, roll around your baby finger and overlap the two corners. Lay on a paper tray or a normal tray covered with parchment, make regular rows and avoid that they come into contact with one another or they will stick together.

Cook them in the boiling stock and serve them still fuming hot.


THE CHRISTMAS LOG, A GREAT CLASSIC

This Christmas Log, also known as Swiss Roll, originates from the French Bûche de Noël.

It represents the ancient tradition of burning a large log in the fireplace which started on Christmas eve and was supposed to last for the entire festive period, later replaced by this suggestive dessert. Nowadays, the different fillings for the sponge cake can vary from pistachio to tropical fruits. In the European tradition, we can find similar cakes all over the Western countries, such as in Spain with its Brazo de Gitano literally the Gipsy’s Arm, which probably share a very common concept.

Although it is not an extremely difficult recipe, it is fundamental to respect the temperature and cooking time for the sponge cake. If it dries out too much, it will be impossible to roll, and it will break.

Prep Time: 45 minutes | Cooking Time: 15 minutes | Total Time: 1 hour| Yield: Makes 6 servings.


Ingredients

For the sponge cake

  • 5 eggs
  • 1 pinch sea salt
  • 1 tsp vanilla
  • ½ tbsp (10 g) honey
  • 1 cup (100 g) cake flour, sifted
  • ¾ cup (140 g) white sugar

For the chocolate ganache

  • 1½ cups (350 ml) fresh whipping cream
  • 12.5 oz (350 g) dark chocolate, chopped


Instructions

Put a bowl in the freezer.

For the sponge cake

Pre-heat the oven at 425° F (220° C)

Separate the eggs, and put the yolks in the bowl of a free-standing mixer and in another bowl, whip the egg whites with a pinch of salt.

Add the honey, the sugar, and the vanilla to the yolks, and beat for 7 to 9 minutes with the whisk attachment.

Gently fold in the whipped egg whites in two batches using a large spoon, with large circular movements from top to bottom.

When it is well-mixed, add the flour in 3-4 batches. Pour the batter in a 12×15 inch (30×37 cm) baking pan, covered by parchment. Level it, creating a ½ inch (1 cm) layer.

Bake for 5-6 minutes until golden and firm.

While it is baking, prepare a film layer on the kitchen top, the surface must be larger than the one of the sponge cake.

When the sponge cake is ready, lay the top of it on the film, take the parchment off immediately, and sprinkle with 2 tablespoons of sugar, in order not to make it stick together. Roll it immediately, using the film to help your work, close and leave it in the film.

For the chocolate ganache

Put the cream on the stove and bring it to almost a boil. Switch off and pour the chocolate in it. Mix it with a whisk until chocolate will be perfectly melted.

Move to the bowl you take off the freezer and whip with an electric hand whisk for 10 minutes.

Spread half of the ganache on the sponge cake, except 1-inch (2 cm) from the border. Roll it again, cut a small piece which shall be connected to the log, in order to make a small branch.

Spread the rest of the ganache on the log and use the prongs of a fork to simulate the surface of a log.